A steamy mirror, lingering odors, and the unwelcome sight of mold or mildew – these are all tell-tale signs of inadequate bathroom ventilation. While the exhaust fan itself plays a crucial role, its effectiveness hinges almost entirely on a properly installed bathroom fan duct. Without a clear path to the outside, your fan is simply circulating humid air within your home, leading to potential damage and unhealthy indoor air quality.
This comprehensive DIY guide will walk you through everything you need to know about installing or upgrading your bathroom fan duct, ensuring your bathroom stays fresh, dry, and healthy. We’ll cover planning, material selection, step-by-step installation, and essential tips for optimal performance.
Key Takeaways
- Proper ventilation is critical for preventing mold, mildew, peeling paint, and poor air quality in your bathroom.
- Always vent to the outdoors, never into an attic, crawlspace, or wall cavity, as this can cause significant moisture problems.
- Choose the right duct material and size for efficiency, with rigid metal ducts generally preferred for smoother airflow.
- Minimize bends and keep duct runs as short and straight as possible to maximize airflow and fan efficiency.
- Seal all duct connections thoroughly with mastic or UL-approved foil tape (not regular duct tape) to prevent air leaks and condensation.
- Insulate ducts running through unconditioned spaces (like attics) to prevent condensation.
- Adhere to local building codes for fan sizing, termination points, and electrical work.
Understanding Your Bathroom Fan & Ductwork
Before you begin your DIY guide journey, it’s essential to understand the components and principles of effective bathroom ventilation.
The Importance of Bathroom Ventilation
Bathrooms are hotbeds for moisture. Every shower, bath, and flush releases humidity into the air. If this moist air isn’t effectively removed, it can lead to:
- Mold and mildew growth: A major health concern and damaging to surfaces.
- Peeling paint and wallpaper: Moisture causes finishes to degrade over time.
- Warped wood: Affecting cabinets, door frames, and structural elements.
- Poor indoor air quality: Lingering odors and potential allergens.
A properly installed exhaust fan and bathroom fan duct system actively pulls this humid air out of your home, replacing it with fresh air and preventing these issues.
Types of Bathroom Exhaust Fans
While this guide focuses on ducting, knowing the fan types is helpful:
- Ceiling-Mounted Fans: The most common, installed in the ceiling and venting through ductwork to the outside.
- Wall-Mounted Fans: Ideal for bathrooms without attic access, these vent directly through an exterior wall.
- Inline Fans: Placed within the ductwork in an attic or ceiling void, these are known for quieter operation and can ventilate multiple areas.
Ducting Materials: What’s Best for Your Project?
The type of duct you choose significantly impacts airflow and longevity.
- Rigid Metal Duct (Smooth-Wall): Galvanized steel or aluminum. This is widely considered the best option for optimal airflow due to its smooth interior, which minimizes air resistance. It’s durable but can be more challenging to install, especially with many bends.
- Semi-Rigid Aluminum Duct: Offers a balance between flexibility and smooth airflow. Easier to install than rigid metal but less durable.
- Flexible Duct (Foil or PVC-coated wire coil): Inexpensive and easy to install, especially around obstacles. However, its ribbed interior creates more air resistance, reducing fan efficiency. It should be kept as short and straight as possible and is prone to sagging, which can trap condensation. Insulated flexible duct is a good option when running through unconditioned spaces.
Expert Tip: Whenever possible, use rigid round ducting. If space is limited, flat ducting is better than flexible ducting.
Sizing Your Ductwork Correctly
Matching your duct size to your fan’s exhaust port is crucial. Most fans use 4-inch diameter ducts, but higher CFM fans might require 6-inch ducts. Using a duct that’s too small for the fan will restrict airflow and reduce efficiency. If your fan has two duct collar size options (e.g., 4″ and 6″), always use the larger size if possible for better performance.
Common Duct Routing Options
Your home’s structure will dictate the best exit point for your bathroom fan duct:
- Through the Roof: Common for bathrooms on upper floors or central to the house. Requires a roof cap.
- Through a Soffit: An option if the bathroom is near the eaves. Requires a soffit vent. Ensure proper transitioning to avoid kinking the ductwork.
- Through a Side Wall: Best for bathrooms on an exterior wall. Requires a wall cap.
- Under-Floor Venting: A viable alternative in multi-story homes where traditional venting isn’t possible, involving running ductwork beneath the floor to an exterior wall.
Crucially, never vent into an attic, crawlspace, or other enclosed area. This traps moisture and leads to mold, rot, and unhealthy air.
Gather Your Tools and Materials
Having everything on hand before you start will make the installation smoother.
Essential Tools List
- Drill and drill bits
- Drywall saw or utility knife
- Measuring tape and pencil
- Caulking gun
- Wire strippers and electrical tape
- Screwdrivers (Phillips and flathead)
- Adjustable wrench or pliers
- Safety glasses, dust mask, gloves
- Ladder or step stool
- Circuit tester
- Reciprocating saw (for larger cuts, e.g., roof/wall holes)
Required Materials List
- New bathroom exhaust fan (if replacing or installing new)
- Ductwork (rigid metal, semi-rigid, or insulated flexible, matching fan diameter)
- Exterior vent cap (roof, wall, or soffit, with a backdraft damper)
- Foil mastic tape or duct sealant (UL-approved)
- Duct clamps or zip ties
- Insulation sleeves (if ducting through unconditioned spaces)
- Wood screws (for mounting fan and brackets)
- Exterior caulk (weatherproof)
- Wire nuts
- GFCI protected circuit if installing over a tub/shower
Safety First!
Always turn off power to the circuit at your main breaker box before beginning any electrical work. Use a circuit tester to confirm the power is off.
Pre-Installation Checklist: Planning for Success
Thorough planning prevents headaches later.
Locating the Best Fan and Vent Exit Point
- Fan Placement: Ideally, position the fan in the ceiling, near (within 5 feet) the shower or tub, which are the main sources of moisture. If directly above a tub or shower, ensure the fan is UL listed for wet locations and connected to a GFCI-protected circuit.
- Duct Route: Plan the most direct route to the outside with the fewest possible bends. Each 90-degree elbow significantly reduces airflow, equivalent to adding several feet of straight duct. Aim for at least two feet of straight duct from the fan’s exhaust port before the first elbow.
- Exterior Vent Location: Ensure the exterior vent cap is placed at least 3 feet from any windows or doors and away from air inlets to prevent exhaust from re-entering your home.
Checking Local Building Codes
Local codes often have specific requirements for exhaust fan installation, including minimum CFM ratings, ducting materials, and termination points. Always check with your local building department to ensure compliance. For instance, the International Residential Code (IRC) typically requires bathrooms to have mechanical exhaust capacity of at least 50 CFM for intermittent operation or 20 CFM for continuous operation, exhausted directly to the outdoors.
Step-by-Step: The Ultimate Bathroom Fan Duct Installation Guide
This section outlines the process for a typical ceiling-mounted fan with attic access. Adjust steps as needed for wall-mount installations or different routing.
Step 1: Preparing the Fan Opening
- Turn off power at the circuit breaker.
- Locate joists: From the attic, identify the ceiling joists to determine where the fan housing will mount. The fan should be centered on your marked opening.
- Mark and cut the ceiling hole: If replacing, you might need to enlarge the existing hole. Use the new fan housing or a template to mark the exact dimensions on the ceiling. Drill a pilot hole, then carefully cut the drywall with a drywall saw or utility knife.
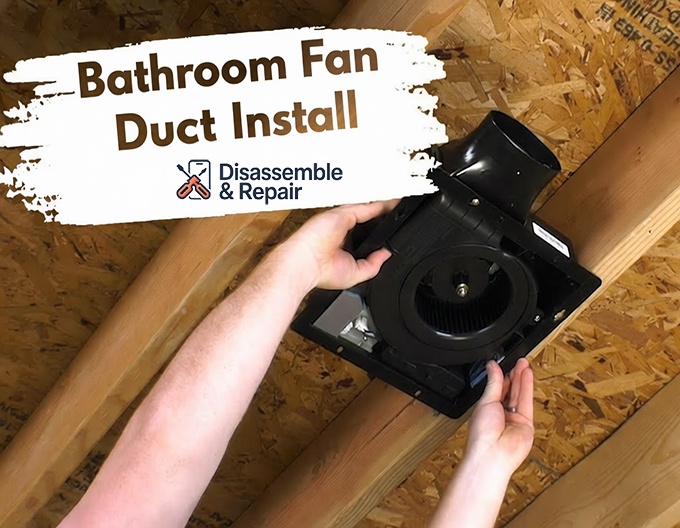
Step 2: Securing the Fan Housing
- Attach mounting brackets: Extend the fan’s mounting brackets (if applicable) to span between the ceiling joists.
- Secure the housing: Position the fan housing in the opening and secure it to the joists with screws, ensuring it’s flush with the ceiling. Fold down any pre-cut tabs on the housing to account for drywall thickness.
Step 3: Routing the Ductwork
This is where your pre-planned route comes into play.
- General Ducting Principles:
- Keep it short and straight: Aim for the most direct path to the exterior.
- Slope for drainage: Pitch the ductwork slightly downwards towards the exterior to allow any condensation to drain away from the fan.
- Support the duct: Prevent sagging, especially with flexible ducting, which can create moisture traps and restrict airflow. Use hangers or straps every few feet.
- Insulate in unconditioned spaces: If the duct runs through an attic or other unheated/uncooled area, it must be insulated to prevent condensation.
- Through the Attic to a Roof Vent:
- From the attic, identify the location for the roof cap, ensuring it’s clear of obstructions.
- Carefully cut a hole in the roof, large enough for the vent and tailpipe, removing shingles as needed.
- Run the chosen duct material from the fan’s exhaust port to the roof opening.
- Connect the duct to the roof cap’s tailpiece.
- Through the Soffit:
- Locate a clear spot in the soffit near the bathroom.
- Cut a hole and install a soffit vent.
- Route the bathroom fan duct from the fan to the soffit vent.
- Through a Side Wall:
- Choose an exterior wall location, avoiding windows and doors.
- From inside, mark and cut a hole through the exterior wall, matching the duct diameter.
- Route the duct from the fan to this opening.
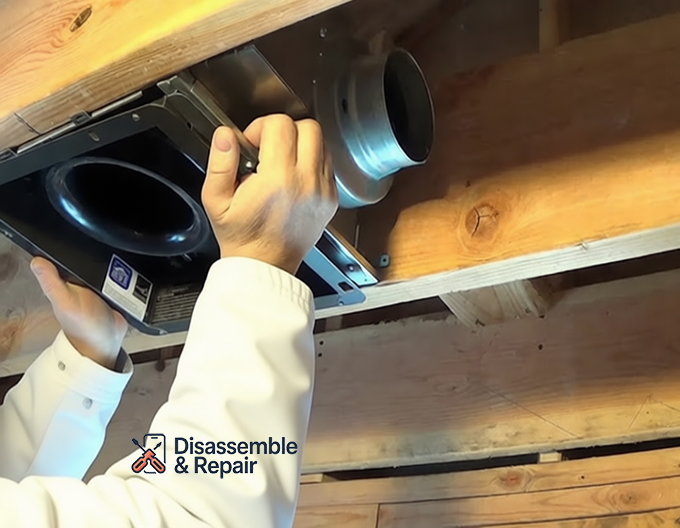
Step 4: Connecting the Duct to the Fan
- Attach duct adapter: If your fan has an adapter, ensure it’s securely in place on the fan’s exhaust port. Many fans have an integrated backdraft damper; ensure it’s not obstructed.
- Connect ductwork: Slide one end of the duct over the fan’s exhaust port (or adapter). Secure it tightly with a metal pipe clamp or zip tie.
Step 5: Installing the Exterior Vent Cap
- Install the cap: From the outside, insert the vent cap into the prepared hole (roof, soffit, or wall).
- Secure the cap: Fasten it to the exterior surface with screws. For roof vents, ensure proper flashing to prevent leaks.
- Test damper: Make sure the cap’s backdraft damper opens and closes freely.
- Seal around cap: Apply a generous bead of exterior caulk around the edges of the vent cap to create a weatherproof seal and prevent pests.
Step 6: Sealing All Connections (Crucial for Efficiency)
This step is critical for preventing air leaks and ensuring your ventilation system works efficiently.
- Seal all duct joints: Wrap all connections (fan to duct, duct sections, duct to exterior cap) tightly with UL-approved foil mastic tape or apply duct mastic sealant. Do NOT use standard cloth duct tape, as it degrades over time and loses its sealing properties.
- Seal fan housing to ceiling: Air seal around the fan housing where it meets the drywall with caulk or spray foam to prevent attic air from being pulled into the bathroom.
Step 7: Making Electrical Connections (When to Call a Pro)
If you’re comfortable with basic electrical wiring and the existing wiring is suitable, you can proceed. If not, hire a qualified electrician.
- Run electrical cable: If installing a new fan, run appropriate electrical cable from the power source (usually a light switch) to the fan.
- Connect wires: Remove the wiring cover from the fan housing. Connect the house wires to the fan wires: typically black to black (hot), white to white (neutral), and bare copper or green to ground. Use wire nuts and ensure connections are secure.
- Secure wiring: Feed the wires back into the housing and replace the cover.
- Install switch: Install a new switch or integrate the fan into an existing switch. Consider a timer switch to ensure the fan runs long enough after a shower (e.g., 15-30 minutes) to clear all moisture.
Step 8: Finishing and Testing
- Replace fan motor and grille: Reinstall the fan motor assembly into the housing, and then attach the decorative grille cover.
- Restore power: Turn the power back on at the circuit breaker.
- Test the fan: Turn on the fan. You should hear it operating. To check airflow, hold a piece of toilet paper or a tissue near the grille; it should be pulled and held against the fan. Check the exterior vent to ensure the damper opens and air is flowing out.
Troubleshooting Common Ventilation Solutions Issues
Even with a perfect DIY guide, issues can arise. Here’s how to address common problems:
- Weak Airflow:
- Check dampers: Ensure both the fan’s internal damper and the exterior vent cap’s damper are opening freely and not obstructed by debris or paint.
- Duct obstructions: Look for blockages (e.g., bird nests, debris) in the ductwork or exterior cap.
- Duct sagging or kinks: Improperly supported flexible ducts can sag and collect condensation, restricting airflow.
- Too many bends/long run: If the duct run is excessively long or has too many sharp bends, the fan may not be powerful enough to move air efficiently.
- Dirty fan blades/grille: Dust and lint buildup can significantly reduce airflow.
- Fan too small: The fan’s CFM might be inadequate for your bathroom size.
- Excessive Noise:
- Loose components: Check if the fan motor, grille, or housing is loose. Tighten any screws.
- Duct vibration: Ensure ductwork is adequately supported and not rattling against joists or other structures.
- Dirty fan: Buildup on blades can cause imbalance and noise.
- High Sone Rating: Some fans are simply louder than others. Look for models with low sone ratings (e.g., 1.0 sone or less) for quiet operation.
- Condensation Problems (despite fan use):
- Uninsulated ductwork: If ducts run through an unconditioned attic, they must be insulated to prevent warm, moist air from condensing inside.
- Duct sagging: Sagging ducts can trap condensed water.
- Fan not running long enough: Ensure the fan runs for at least 15-20 minutes after a shower, or use a timer.
- Leaky duct connections: Unsealed joints can allow moist air to escape into the attic.
Maintenance Tips for Long-Lasting Performance
Regular maintenance keeps your ventilation system efficient.
- Clean the grille and fan blades: Periodically remove the grille and vacuum or wipe down the fan blades to prevent dust buildup.
- Check exterior vent: Annually inspect the exterior vent cap for obstructions (e.g., bird nests, leaves) and ensure the damper is operating.
- Inspect ductwork: If accessible, check the ductwork for sags, tears, or disconnected sections. Reseal any loose joints.
- Listen for changes: Pay attention to unusual noises or decreased airflow, which could signal a problem.
Conclusion: Breathe Easy with Your DIY Success
Congratulations! By following this ultimate DIY guide, you’ve gained the knowledge and steps necessary for a successful bathroom fan duct installation. This essential home improvement project not only enhances the comfort and freshness of your bathroom but also plays a vital role in protecting your home from moisture damage and promoting a healthier indoor environment. Enjoy the lasting benefits of superior ventilation and breathe easy in your well-ventilated space.
FAQ
Why is proper bathroom ventilation important?
Proper ventilation is critical for preventing common bathroom problems like mold, mildew, peeling paint, and poor indoor air quality, which are caused by inadequate moisture removal and humid air circulation within your home.
Where should a bathroom fan duct always vent?
A bathroom fan duct must always vent directly to the outdoors. It’s crucial never to terminate it into an attic, crawlspace, or wall cavity, as this will lead to significant moisture buildup, potential damage, and unhealthy conditions.
What type of duct material is best for bathroom fans?
For optimal efficiency and smoother airflow, rigid metal ducts are generally preferred over flexible options.
How can I maximize my bathroom fan’s efficiency?
To maximize airflow and fan efficiency, you should minimize bends in the ductwork and keep the duct runs as short and straight as possible. Additionally, it’s essential to seal all duct connections thoroughly with mastic or UL-approved foil tape (avoiding regular duct tape) and insulate ducts running through unconditioned spaces like attics to prevent condensation.


