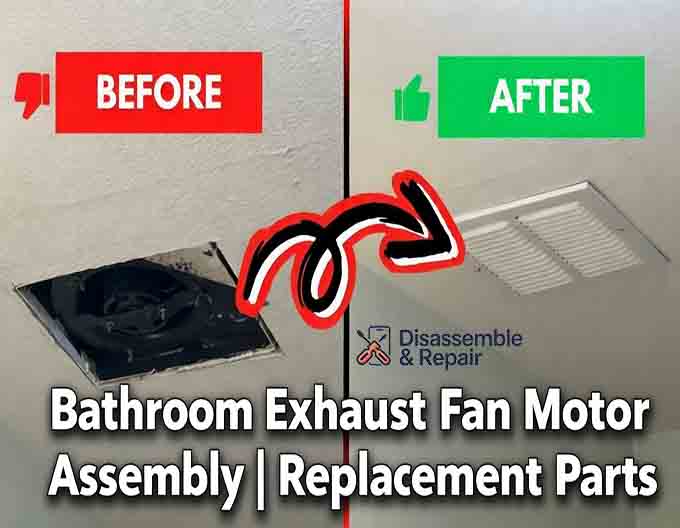
A high-functioning Bathroom Exhaust Fan Motor Assembly is the critical heart of any residential ventilation system, ensuring moisture and odors are efficiently removed from your home. Without a properly operating assembly, humidity accumulates, leading to mold growth, peeling wallpaper, and compromised indoor air quality. As a Senior SEO Specialist and home improvement technical expert, I have compiled this comprehensive guide to help you understand, troubleshoot, and replace this essential component.
Understanding the Bathroom Exhaust Fan Motor Assembly
The Bathroom Exhaust Fan Motor Assembly refers to the complete unit inside your ceiling ventilation housing that generates airflow. Unlike a simple standalone motor, this assembly typically includes the motor itself, the mounting bracket, and the fan blade mechanism—either a blower wheel or an impeller.
For homeowners and technicians alike, distinguishing between the individual parts is vital for accurate diagnostics. The assembly is designed to fit precisely into the ventilation housing (the metal box installed in the ceiling), making it a modular component that is often easier to replace than the entire fan unit.
Key Components of the Assembly
To maintain or repair your system, you must identify these core parts:
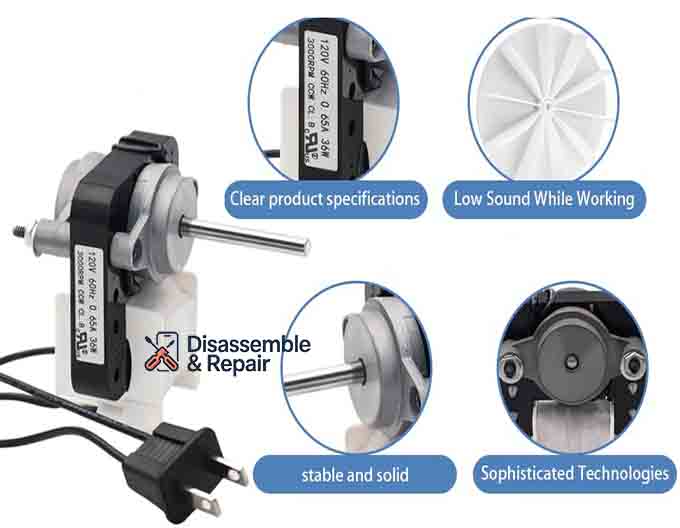
- Electric Motor: The power source, typically running on standard 120V voltage specifications in North American homes. It drives the rotation necessary to move air.
- Blower Wheel vs. Impeller:
- Impeller: Resembles a propeller and is found in axial fans. It moves air parallel to the shaft and is best for wall-mounted or short-duct applications.
- Blower Wheel: Also known as a squirrel cage, this cylindrical wheel is used in a centrifugal fan. It draws air into the center and pushes it out at a 90-degree angle, creating higher pressure suitable for long duct runs.
- Mounting Bracket: The metal plate or frame that secures the motor inside the housing. In many universal replacement kit options, this bracket is adjustable to fit various housing sizes.
- Motor Shaft: The rotating metal rod extending from the motor. The blower wheel or impeller attaches directly to this shaft, often secured by a tension spring or a set screw.
Technical Specifications: CFM Rating and Sone Level
When selecting a replacement Bathroom Exhaust Fan Motor Assembly, two primary metrics dictate performance: the CFM rating and the Sone level.
CFM Rating (Cubic Feet per Minute)
The CFM rating measures the volume of air the fan moves per minute. A standard rule of thumb is 1 CFM per square foot of bathroom area.
- 50 CFM: Suitable for small half-baths (powder rooms).
- 80-110 CFM: Recommended for full bathrooms, especially those with high ceilings or large showers.
If you install a motor with a CFM rating that is too low, moisture will remain on mirrors and walls. Conversely, a rating that is too high for the duct diameter can cause excessive noise and back pressure.
Sone Level
The Sone level measures the loudness of the fan.
- 4.0 Sones: Loud, comparable to a standard television volume.
- 1.0 Sone or less: Considered “ultra-quiet,” similar to the hum of a quiet refrigerator.
Higher-end brands like Broan-NuTone often prioritize low Sone levels in their premium motor assemblies. When upgrading, look for a motor that balances a high CFM with a low Sone rating for the best user experience.
Types of Fan Assemblies: Centrifugal vs. Axial
Understanding the aerodynamic design of your fan is crucial when sourcing parts.
Centrifugal Fan Assemblies
A centrifugal fan assembly is the industry standard for ducted systems. It uses a blower wheel to generate high pressure, which is necessary to push air through long ductwork that vents through a roof or soffit. These are typically quieter and more efficient at overcoming static pressure (resistance in the duct) than axial fans.
Axial Fan Assemblies
Axial fans use a propeller-style impeller. They are excellent at moving large volumes of air but struggle with resistance. These are often found in “through-the-wall” exhaust fans or older economy models where the duct run is very short. Replacing a centrifugal motor with an axial one in a long-duct system will result in poor performance and increased noise.
Safety Features: Thermal Protection
Safety is paramount in electrical appliances exposed to moisture and heat. Modern bathroom fan motors are equipped with thermal protection. This feature prevents the motor from overheating, which could potentially cause a fire.
There are two main types of thermal protection found in these assemblies:
- Thermal Fuse: A one-time safety device. If the motor winding temperature exceeds a safe limit (often due to dust buildup or bearing failure), the fuse blows and cuts power permanently. The motor must be replaced.
- Auto-Reset Thermal Overload: This system temporarily shuts down the motor if it overheats. Once the motor cools down, it automatically resets and allows the fan to run again.
Note: If your fan cycles on and off repeatedly, it is likely triggering the auto-reset thermal protection. This is a sign of a failing motor or clogged ventilation that requires immediate attention.
Troubleshooting Common Issues
Before purchasing a new Bathroom Exhaust Fan Motor Assembly, perform these checks to confirm the motor is the culprit.
1. The Fan Hums but Won’t Spin
This usually indicates a seized motor shaft or bad bearings.
- Test: With the power off, try to spin the blower wheel by hand. If it is stiff or gritty, the bearings are shot. Cleaning it might offer a temporary fix, but replacement is inevitable.
2. Excessive Noise
Rattling or grinding noises often come from a dirty blower wheel that is unbalanced or a loose mounting bracket.
- Fix: Clean the wheel thoroughly. If the noise persists, the motor bearings are likely worn out.
3. Poor Airflow
If the motor runs but the bathroom stays steamy, check the ventilation housing and ductwork for blockages. If the path is clear, the motor may have lost torque and is no longer spinning at its rated RPM, failing to meet its CFM rating.
Replacement Guide: Universal Kits vs. OEM Parts
When it is time to replace the motor, you have two main paths: Original Equipment Manufacturer (OEM) parts or a universal replacement kit.
Broan-NuTone and OEM Replacements
Brands like Broan-NuTone provide exact-fit replacement assemblies. These are the easiest to install because the mounting bracket and power plug are designed specifically for your existing housing. You simply unplug the old unit, snap the new one in, and you are done.
Universal Replacement Kits
A universal replacement kit is a versatile option, especially for older fans where OEM parts are discontinued. These kits typically include:
- A motor with a standard shaft length.
- Multiple mounting bracket styles to adapt to different housings.
- New hardware.
Installation Tip: When using a universal kit, pay close attention to the motor shaft length. If the shaft is too long, the blower wheel may rub against the housing; if it is too short, the wheel may not sit in the airflow stream correctly.
Step-by-Step Replacement Procedure
Follow these steps to safely replace your Bathroom Exhaust Fan Motor Assembly.
Step 1: Preparation and Safety
Turn off the wall switch and, ideally, the circuit breaker to ensure voltage specifications are not live during work. Remove the plastic grille by pulling it down and squeezing the mounting springs.
Step 2: Remove the Old Assembly
Most assemblies are plugged into a small receptacle inside the ventilation housing. Unplug the motor cord. Look for a screw or a tab securing the mounting bracket to the housing. Remove the screw or release the tab, then lower the assembly out of the ceiling.
Step 3: Transfer or Install Components
If you bought just a bare motor, you will need to transfer the blower wheel and mounting bracket from the old unit.
- Loosen the set screw or clamp on the blower wheel to slide it off the old motor shaft.
- Unscrew the motor from the bracket.
- Install the new motor onto the bracket and reattach the fan wheel. Ensure the wheel spins freely without hitting the bracket.
Step 4: Reinstallation
Lift the new Bathroom Exhaust Fan Motor Assembly back into the housing. Insert the bracket tab into its slot and secure it with the screw. Plug the motor into the housing’s receptacle.
Step 5: Testing
Turn the power back on. The fan should spin up immediately. Listen for a smooth operation. A quiet hum is normal; loud vibration is not. Verify airflow by holding a single square of toilet paper near the grille; the suction should hold it in place.
Conclusion
Maintaining your bathroom’s air quality relies heavily on the condition of your Bathroom Exhaust Fan Motor Assembly. Whether you are dealing with a noisy bearing, a triggered thermal protection fuse, or simply upgrading for a better CFM rating and lower Sone level, understanding these components empowers you to make the right repair decisions. By choosing the correct centrifugal fan or axial model and following proper installation procedures, you ensure your home remains free of damaging moisture for years to come.
Frequently Asked Questions
How do I determine the correct CFM rating for my bathroom?
The industry standard is to provide 1 CFM (Cubic Feet per Minute) for every square foot of the room. For a standard 50-square-foot bathroom, a 50 CFM motor assembly is sufficient. However, for full bathrooms with large showers or high ceilings, it is recommended to use a motor rated between 80 and 110 CFM to ensure all moisture is effectively removed.
Why is my exhaust fan making a loud grinding or rattling noise?
Excessive noise is typically caused by one of three things: a dirty or unbalanced blower wheel, a loose mounting bracket, or worn-out motor bearings. If cleaning the dust off the blades doesn’t solve the problem, the bearings inside the motor are likely failing. In this case, replacing the entire motor assembly is the most effective long-term solution.
What is the difference between a blower wheel and an impeller?
An impeller looks like a traditional propeller and is used in axial fans to move air parallel to the motor shaft; these are best for very short duct runs. A blower wheel, often called a “squirrel cage,” is used in centrifugal fans. It is designed to create higher pressure, making it much more efficient at pushing air through long stretches of ductwork to reach the outside of the home.
What should I do if my fan stops running and then starts again later on its own?
This is a sign that the motor’s auto-reset thermal protection is being triggered. The motor is overheating—likely due to a mechanical struggle, bad bearings, or a clogged vent—and is shutting itself off to prevent a fire. Once the motor cools down, it resets and runs again. If this happens, you should inspect the unit immediately for blockages or replace the failing motor assembly.
Can I use a universal replacement kit if I can’t find my specific fan brand?
Yes, universal replacement kits are designed for this exact scenario. They typically include a motor with a standard shaft and various mounting brackets to fit different housing sizes. When using a universal kit, ensure the CFM rating matches your needs and pay close attention to the motor shaft length so the fan wheel sits correctly within the ventilation housing.


