Knowing how to remove old bathroom fan housing is a critical skill for homeowners looking to upgrade their ventilation system without causing unnecessary ceiling damage. Whether your current unit is rattling, inefficient, or simply outdated, properly extracting the metal casing requires a methodical approach to avoid disturbing the surrounding insulation and drywall.
This guide provides a professional, step-by-step procedure to safely remove your exhaust fan assembly, ensuring you are ready for a seamless replacement.
Safety and Preparation: The Critical First Steps
Before you touch a single screwdriver, you must prioritize electrical safety. Bathroom fans operate in humid environments, making electrical caution even more paramount than in dry areas of the home.
Electrical Safety Protocols
The very first step is to locate your home’s main service panel. Find the circuit breaker that controls the bathroom circuit and switch it to the “OFF” position. Do not rely solely on the wall switch, as older homes may have inconsistent wiring loops.
Once the power is cut, enter the bathroom and turn on the fan switch to confirm it does not activate. For absolute certainty, you will need to use a voltage tester later in the process when you expose the actual wires. This non-contact tool is essential for verifying that no live current is flowing to the fan.
Gathering the Right Tools
To remove the housing efficiently, you will need a specific set of tools. Having these ready will prevent mid-project interruptions:
- Voltage tester: To confirm the power is off.
- Screwdrivers: Both flathead and Phillips head (a long-shaft screwdriver is often helpful for reaching deep screws).
- Pry bar: A flat pry bar is best for separating the housing from joists without crushing the sheetrock.
- Utility knife: For cutting away caulk or paint seals.
- Reciprocating saw (optional): Useful if you need to cut mounting bars from below.
- Safety gear: Dust mask and safety goggles (protection from falling insulation and dust).
- Flashlight or Headlamp: Essential for seeing inside the dark housing.
Step-by-Step: How to Remove Old Bathroom Fan Housing
This section details the mechanical removal of the unit. While some steps may vary slightly depending on the brand (e.g., Broan, NuTone, Panasonic), the general anatomy of a ventilation system remains consistent.
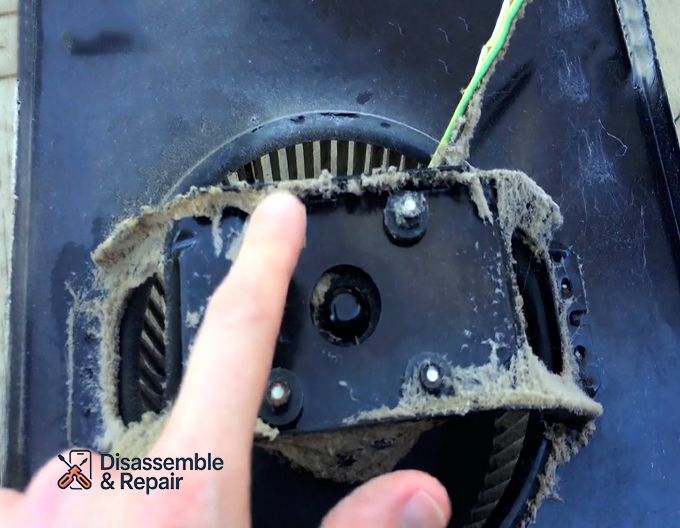
Step 1: Remove the Grille and Fan Motor
Start by removing the plastic cover (grille). Gently pull it down a few inches until you see the mounting springs. Squeeze the springs together to release them from the slots in the housing.
With the cover off, you will see the fan motor assembly inside the metal box.
- Unplug the motor: Most motors are connected to a small receptacle inside the housing via a simple two-prong plug or a quick-connect wiring harness. Unplug this connection.
- Remove the motor plate: Look for a screw or a tab securing the motor plate to the housing. Remove the screw or release the tab, then wiggle the motor assembly out of the housing. Removing this heavy component first makes the rest of the job significantly easier.
Step 2: Disconnect the Electrical Wiring
Now that the motor is out, locate the electrical box (junction box) built into the corner of the fan housing.
- Remove the metal cover of the junction box (usually held by one screw).
- Pull the house wires out gently. You should see black (hot), white (neutral), and copper/green (ground) wires.
- Use your voltage tester on these wires one last time to ensure they are dead.
- Unscrew the wire nuts connecting the house wires to the fan wires.
- Loosen the cable clamp (romex connector) that secures the house wiring as it enters the box. Push the house wires back out of the box so they are free from the housing.
Step 3: Detach the Ductwork
The ductwork is responsible for venting moist air outside. It is typically attached to a discharge collar on the side of the housing.
- If you have attic access, go into the attic to disconnect the duct. It is usually held on by duct tape or a screw clamp.
- If you do not have attic access (working entirely from below), you may need to push the housing up slightly or use a screwdriver to reach the duct connection from inside the housing. If the duct is rigid pipe, this can be difficult; if it is flexible, you can often detach it after the housing is loose.
Step 4: Locate and Remove Mounting Fasteners
This is often the most challenging part of how to remove old bathroom fan housing. The metal box is secured to the ceiling joists in one of two ways: directly to a joist or using suspension bars.
Scenario A: Direct Mount to Joist
Look for screws or nails driven through the side of the metal housing directly into a wooden joist.
- Screws: simply back them out.
- Nails: Use a flat pry bar or a nail puller to extract them. If the heads are stripped or inaccessible, you may need to use a rotary tool or a small hacksaw to cut the nail heads off inside the housing.
Scenario B: Suspension Bars (Mounting Brackets)
Many fans are suspended between two joists using adjustable mounting brackets. These bars are often nailed into the joists, sometimes obscured by the ceiling drywall.
- To remove these from below, you may need to cut the bars. A reciprocating saw with a metal-cutting blade is the most effective tool here. Carefully cut the bars as close to the housing as possible, allowing you to pull the housing down while leaving the cut ends of the bars in the ceiling.

Handling Attic Access vs. Room-Side Removal
The method you choose largely depends on the architecture of your home.
Removal via Attic Access
If you have an accessible attic, the job is considerably easier. You can clear away the insulation covering the housing to see exactly how it is attached. From the attic, you can easily unscrew the mounting brackets from the joists and disconnect the ductwork and electrical lines without working overhead. Once free, the housing can often be lifted up into the attic or pushed down through the bathroom ceiling.
Removal from Room-Side (No Attic Access)
For first-floor bathrooms or apartments, you must work entirely from below. This requires precision to avoid damaging the sheetrock.
- Score the Perimeter: Use a utility knife to score the paint around the edge of the metal housing where it meets the ceiling. This prevents the ceiling paint from peeling away when you pull the housing down.
- Bend the Housing: If the housing is nailed tightly to a joist and you cannot reach the nails, use a large pair of pliers or a pry bar to bend the metal sides of the housing inward. Crumpling the metal box can pull it away from the joist, exposing the fasteners or simply freeing the unit enough to pull it down.
Common Challenges and Troubleshooting
Even with a plan, you may encounter obstacles. Here is how to handle common issues.
The Wiring Harness is Stuck
In some modern or high-end units, the motor might be connected via a plastic wiring harness that clips in rather than a standard plug. If you cannot unplug it, look for a release tab on the connector. Do not yank the wires, as this could damage the house wiring connected to the electrical box. If necessary, you can cut the fan-side wires (ensure power is OFF first), provided you are discarding the old motor.
Damaged Sheetrock
It is common for the sheetrock around the fan to crumble slightly during removal.
- Minor damage: Can be covered by the grille of the new fan, which is usually slightly larger than the housing.
- Major damage: You may need to patch the ceiling. If your new fan housing is smaller than the old one, you will definitely need to patch the drywall and paint. Conversely, if the new housing is larger, you can simply use a drywall saw to enlarge the hole, removing the damaged edges in the process.
Rigid Ductwork
If your ventilation system uses rigid metal ducting instead of flexible hose, you cannot easily “pull” it off. You may need to unscrew the screws securing the duct to the fan outlet from inside the housing. If the screws are on the outside and you have no attic access, you might have to cut the old housing apart with tin snips to access the connection point.
Final Steps and Clean Up
Once the old housing is removed, you will be left with a hole in the ceiling, a hanging ductwork connection, and exposed electrical wires.
- Inspect the Void: Check for mold or moisture damage on the joists, which could indicate the old fan was venting improperly.
- Check the Wiring: Ensure the copper or green ground wire and the insulated conductors are in good condition. If the insulation on the wires is brittle or cracked, you may need to trim them back and strip fresh ends.
- Cap the Wires: If you are not installing a new fan immediately, twist wire nuts onto the exposed wire ends and carefully tuck them up into the ceiling void for safety.
By following this guide on how to remove old bathroom fan housing, you ensure that your bathroom is prepped correctly for a modern, quiet, and efficient upgrade. Taking the time to protect your sheetrock, verify safety with a voltage tester, and properly manage the ductwork will save you time and money during the installation of your new unit.
Frequently Asked Questions
Is it safe to only turn off the bathroom wall switch before starting?
No, you should never rely solely on the wall switch. Because older homes may have inconsistent wiring loops, you must locate the circuit breaker in your home’s main service panel and switch it to the “OFF” position. Always use a non-contact voltage tester to confirm the wires are dead before you begin disconnecting them.
Can I remove the fan housing if I do not have access to the attic?
Yes, you can remove the housing entirely from the room-side. This process involves scoring the paint around the unit with a utility knife to prevent peeling and then either unscrewing the mounting fasteners from below or using a reciprocating saw to cut the mounting bars. In some cases, you may need to use pliers to bend the metal housing inward to pull it away from the joists.
What happens if the ceiling drywall gets damaged during the removal process?
It is common for the sheetrock to crumble slightly. If the damage is minor, the grille of your new fan (which is often larger than the housing) will likely cover it. If the damage is significant or if your new fan is smaller than the old one, you will need to patch the drywall and repaint the ceiling to ensure a professional finish.
How do I disconnect the ductwork if I am working from below?
If you have flexible ducting, you can often reach the connection point through the housing or pull it down slightly once the housing is loose to remove the tape or clamps. If you have rigid metal ducting, you may need to use a screwdriver to reach the screws from inside the housing or use tin snips to cut away portions of the old metal box to reach the connection point.
Why should I remove the motor before the metal housing?
Removing the fan motor and its plate first is a critical step because it removes the heaviest part of the assembly. This makes the housing much lighter and easier to handle, providing you with better visibility and more room to work on the electrical connections and mounting fasteners.