Frustration often mounts quickly when you can’t remove bathroom fan housing during a renovation or repair project. What seems like a simple swap often turns into a battle against hidden fasteners, rusted clips, or inaccessible mounting brackets.
This guide provides a professional, step-by-step approach to safely extracting a stubborn ventilation unit without destroying your ceiling.
Why You Can’t Remove Bathroom Fan Housing
If you are pulling and prying to no avail, it is rarely just friction holding the unit in place. Understanding how these units are installed is key to getting them out.
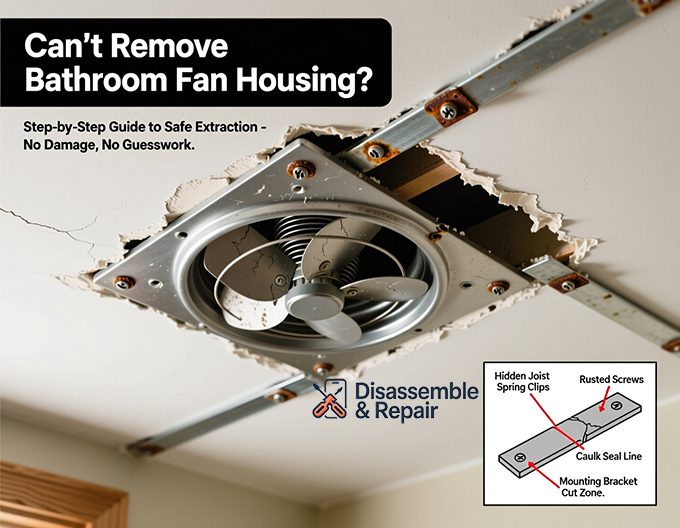
- New Construction Mounting Brackets: Most older fans were installed before the drywall (plasterboard) went up. They use metal bars that span between ceiling joists, meaning the housing is physically wider than the hole in your ceiling.
- Hidden Fasteners: Screws or nails are often driven directly into the joist through the side of the metal canister, hidden by layers of dust or the motor assembly itself.
- Adhesive Seals: Years of bathroom moisture can cause paint and caulk to bond the flange of the housing to the plasterboard, creating a seal that feels like a mechanical fastener.
- Rust and Corrosion: In high-humidity environments, the spring clips or metal tabs securing the motor assembly can rust, fusing the internal components to the housing.
Tools Required for Extraction
Before attempting to force the unit out, gather the following tools to ensure you can adapt your strategy:
- Reciprocating Saw or Oscillating Multi-Tool: Essential for cutting metal brackets that are inaccessible from below.
- Flat Pry Bar: To leverage the housing away from the joist.
- Non-Contact Voltage Tester: To verify safety before touching electrical connections.
- Utility Knife: To score paint and caulk lines.
- Drill with Driver Bits: For removing visible screws.
- Tin Snips: For cutting the sheet metal housing if it needs to be collapsed.
Step-by-Step Removal Strategy
Phase 1: Clear the Internal Components
Never try to pull the entire box down at once. You must strip it to its bare metal shell first.
- Cut the Power: Flip the breaker at your electrical panel. Use your voltage tester on the fan to confirm the power is off.
- Remove the Motor Assembly: The motor is usually held in by a metal plate. Look for one or two screws securing this plate, or specific tabs that need to be pressed. Unplug the motor plug from the receptacle inside the housing and pull the motor out.
- Disconnect Electrical Connections: Locate the junction box inside the housing canister. Remove the metal cover, untwist the wire nuts, and separate the house wiring from the fan wiring.
- Detach the Ductwork: If you can see the exhaust port, try to disconnect the ductwork. Often, this is taped or screwed on. If you cannot reach it, you may need to wait until the housing is loose.
Phase 2: The “Surgical” Removal
If the housing is screwed directly to a joist, you might be able to remove it without cutting.
- Score the Perimeter: Use your utility knife to cut through the paint and caulk around the edge of the fan flange. This prevents the ceiling paint from peeling away when the fan drops.
- Locate the Joist: tap the ceiling or use a stud finder to determine which side of the housing is against a ceiling joist.
- Find the Screws: Shine a light against the inside wall of the housing on the joist side. Look for screw heads. If you find them, remove them.
- Leverage: Insert a pry bar between the housing and the joist. Apply gentle pressure to separate the metal from the wood.
Phase 3: The Destructive Method (For “New Construction” Brackets)
If the fan is suspended by bars between joists (common in units where you can’t remove bathroom fan housing easily), you cannot pull it straight down because the bars are wider than the hole.
- Cut the Brackets: Insert a metal-cutting blade of a reciprocating saw or oscillating tool between the housing and the ceiling edge. Feel for the metal mounting arms and cut through them.
- Collapse the Canister: If the housing is stuck tight, use tin snips or pliers to bend the metal sides of the housing canister inward. By crumpling the box, you reduce its diameter, making it easier to pull through the plasterboard opening.
- Release the Duct: As you pull the unit down, the ductwork will likely still be attached. Pull the unit down just enough to access the duct tape or clamp, cut it free, and push the duct back into the ceiling cavity.
Handling the Aftermath
Once the bathroom exhaust fan is out, you will likely be left with a rough opening.
- Inspect the Duct: Check the existing flexible or rigid ducting for mold or blockage. Now is the best time to replace it if necessary.
- Check the Wiring: Ensure the electrical cable is not nicked or damaged during the removal process.
- Prepare for the New Unit: If you are installing a retrofit fan, you can usually insert it through the existing hole. If you are installing a new construction fan, you will need access to the attic or extensive drywall patching to secure the new mounting brackets.
By systematically breaking down the unit and identifying the hidden mounting method, you can overcome the situation where you can’t remove bathroom fan housing and proceed with your bathroom upgrade efficiently.
Frequently Asked Questions
Why is my bathroom fan housing stuck even though I’ve removed all visible screws?
It is likely held in place by “new construction” mounting brackets, which are metal bars that span between ceiling joists and are wider than the hole in your drywall. Additionally, years of moisture may have caused paint or caulk to bond the flange to the ceiling, or the unit may be secured by hidden fasteners driven directly into the side of a joist.
How can I remove a fan housing that is wider than the ceiling opening?
If you cannot access the unit from an attic, you must use a “destructive” method from below. Use a reciprocating saw or oscillating multi-tool to cut through the metal mounting arms. If it is still stuck, use tin snips to bend and collapse the metal sides of the canister inward to reduce its diameter so it can fit through the hole.
Do I need to go into the attic to disconnect the ductwork?
Not always. In many cases, you can strip the internal components first and then pull the housing down just far enough to reach the exhaust port. From there, you can cut the duct tape or loosen the clamps to free the ducting before fully removing the housing.
What tools are essential for removing a stubborn bathroom fan?
Beyond standard screwdrivers, you should have a non-contact voltage tester for safety, a utility knife to score paint lines, a flat pry bar for leverage, and a reciprocating saw or tin snips if the housing needs to be cut or collapsed for extraction.
How do I prevent damaging my ceiling while prying the housing out?
The most important step is to use a utility knife to score the perimeter of the fan flange where it meets the drywall. This breaks the seal of paint and caulk, ensuring that when the fan is lowered, it doesn’t peel away the ceiling’s finish or tear the plasterboard.


