If you find your LG washer shaking violently during spin, it can be an alarming experience that risks damaging both your appliance and your home’s flooring. This violent vibration often signals an underlying issue with the machine’s stability, load balance, or internal suspension components. While LG manufactures durable front-load washing machines, they are precision instruments that require perfect balance to operate smoothly at high RPMs.
This guide provides a comprehensive troubleshooting pathway for a professional or DIY enthusiast to diagnose and resolve these vibration issues. We will examine every potential cause, from simple leveling adjustments to complex mechanical failures like the spider arm assembly.
Understanding the LG washer shaking violently during spin
Before dismantling the machine, you must rule out user error or environmental factors. The most common cause of a shaking washer is simply an unbalanced load.
LG washers are equipped with sensors that detect when the laundry weight is not distributed evenly inside the drum. When this happens, the machine attempts to rebalance the load by tumbling it slowly. If it fails, it triggers the UE error code (Unbalanced Error).
- Small Loads: Washing a single heavy item, like a wet towel or a bath mat, often causes the drum to spin off-center.
- Bulky Items: Large comforters can clump on one side, creating a pendulum effect that shakes the entire unit.
Solution: Open the door and manually redistribute the wet laundry. Add a few towels to small loads to counterbalance the weight. If the error persists despite a balanced load, the issue lies with the machine’s hardware or calibration.
Foundation and Stability Checks
A front-load washing machine spins at speeds up to 1300 RPM. At this velocity, even a millimeter of unevenness can translate into violent shaking.
Read more LG washing machine OL error
Leveling Legs Adjustment
Your LG washer rests on four leveling legs. If even one leg is not firmly touching the ground, the machine will rock back and forth.
Read more LG washing machine E2 error
- Check with a Bubble Level: Place a carpenter’s level on top of the washer. Check both side-to-side and front-to-back leveling.
- Adjust the Legs: Use the wrench supplied with the washer (or a crescent wrench) to turn the legs. Clockwise usually lowers the leg, while counter-clockwise raises it.
- Locking Nut: Once the washer is perfectly level, tighten the locking nut (jam nut) upward against the base of the washer housing to secure the leg in place.
Washer Floor Stability
Sometimes the washer is fine, but the floor is the problem. Second-floor laundry rooms with wooden joists are prone to flexing. If the floor bows under the weight and vibration of the spin cycle, the washer will bounce.
- Test: Stand in front of the washer while it spins. If you can feel the vibration traveling through the floor into your feet, washer floor stability is likely the culprit.
- Reinforcement: You may need to reinforce the subfloor with ¾-inch plywood or move the washer to a corner where the floor structure is more rigid.
Shipping Bolts (For New Installations)
If your machine is brand new and shaking violently, the shipping bolts are the most likely suspect. These are long bolts inserted into the back of the washer to immobilize the tub during transport.
- The Symptom: If left in, the tub cannot float on its suspension. Instead, the energy of the spinning drum transfers directly to the frame, causing the washer to “walk” or jump.
- The Fix: Locate the 4 bolts on the rear panel. Remove them completely using the provided wrench and cover the holes with the plastic caps included in the accessory bag.
Mechanical Failures: Shock Absorbers and Suspension
If leveling and load balancing do not solve the problem, you are likely dealing with worn-out suspension components. These parts are consumables and will eventually degrade over time.
Shock Absorbers
In a front-load washing machine, shock absorbers are attached to the bottom of the outer tub and the base of the washer frame. Their job is to dampen the movement of the tub during the high-speed spin.
- Diagnosis: Open the front access panel (or remove the back panel depending on the model). Visually inspect the shocks. If you see oil leaking from them, or if the plastic mounting pins are cracked, they are bad.
- The “Push” Test: Push the tub down firmly and release it. It should bounce back once and stop. If it continues to bounce like a pogo stick, the shock absorbers have lost their resistance and must be replaced.
Suspension Springs
While shock absorbers manage the bottom, suspension springs hold the heavy tub assembly from the top frame. These springs prevent the tub from collapsing downward.
- Failure Signs: If a spring stretches or breaks, the tub will list to one side. During a spin, the tub will hit the side of the cabinet, causing a loud banging noise and violent shaking.
- Inspection: Remove the top panel of the washer (usually held by two screws at the back). Check that both springs are securely hooked and not elongated.
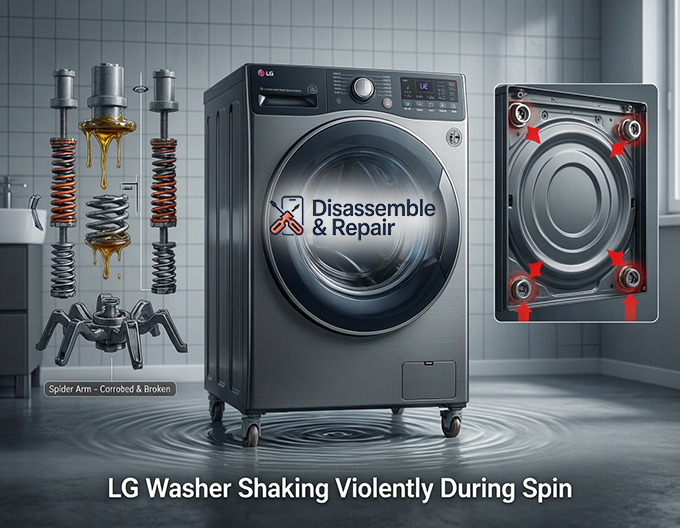
Advanced Repair: Bearings and Spider Arm
If the shaking is accompanied by a loud roaring sound that resembles a jet engine taking off, you are facing a significant mechanical failure.
Tub Bearings
The tub bearings support the drive shaft at the back of the outer tub. When the water seal fails, water enters the bearings, washing away the grease and causing them to rust.
- The Roar: A failing bearing creates metal-on-metal friction. This noise gets louder as the spin speed increases.
- Vibration: As the bearings disintegrate, the inner drum loses its tight axis of rotation. It begins to wobble inside the outer tub, causing the machine to shake violently.
Spider Arm Assembly
The spider arm assembly is a three-pronged aluminum bracket that attaches the stainless steel drum to the motor shaft.
- Galvanic Corrosion: Detergent residue and dissimilar metals often cause the spider arm to corrode and crack.
- Symptoms: If one arm cracks or breaks, the drum will spin in an oval shape rather than a perfect circle. This creates an extreme imbalance that no amount of suspension can dampen.
- Testing: Open the door and push up on the stainless steel drum. If there is significant “play” or “clunking” movement relative to the outer tub, the spider arm is likely broken. This repair requires a complete teardown of the machine.
Technical Solutions: Calibration and Accessories
After replacing parts or moving the washer, you must reset the machine’s internal logic.
Calibration Mode
Modern LG washers have a weight sensing system that needs to be zeroed out. Running calibration mode allows the main control board to measure the empty drum’s resistance and weight.
- Empty the Drum: Ensure the washer is completely empty.
- Enter Mode: Power on the washer. Immediately press and hold two specific buttons (often Temp + Delay End or Spin + Soil) and then press Power. Consult your specific service manual for the exact key combination.
- Run: Press the Start/Pause button. The drum will rotate back and forth for a few minutes. When it finishes (often displaying “End”), turn the washer off. The sensors are now recalibrated.
Vibration Dampening Pads
If you have verified that the machine is mechanically sound but still experience nuisance vibration (common on wood floors), install vibration dampening pads.
- Function: These thick rubber pads sit under each leveling leg. They decouple the machine from the floor, absorbing the kinetic energy before it transfers to your home’s structure.
- Note: These are not a cure for broken shock absorbers. They are a finishing touch for a well-maintained machine.
Conclusion
Resolving an LG washer shaking violently during spin requires a systematic approach. Start with the basics: ensure the shipping bolts are removed, the load is balanced, and the legs are level. If the shaking persists, investigate the shock absorbers and suspension springs. For older machines accompanied by loud roaring noises, be prepared to inspect the tub bearings and spider arm assembly. Regular maintenance, such as running calibration mode and ensuring floor stability, will extend the life of your appliance and keep your laundry routine peaceful.
Frequently Asked Questions
Why is my brand new LG washer jumping and walking across the floor?
If your machine is new, the most likely cause is that the shipping bolts are still installed. These are four long bolts located on the back of the washer that keep the tub stationary during transit. If they are not removed before use, the tub cannot float on its suspension, causing the entire machine to shake violently or “walk” as the drum spins.
What does the “UE” error code mean and how do I fix it?
The “UE” code stands for an Unbalanced Error. It occurs when the washer’s sensors detect that the laundry weight is not distributed evenly, which can happen with a single heavy item (like a bath mat) or bulky bedding that has clumped together. To resolve this, pause the machine and manually redistribute the wet laundry. Adding a few extra towels to a small load can also help provide the necessary counterweight.
How can I tell if my shock absorbers are worn out?
You can perform a simple “push test” to check the health of your shock absorbers. Open the washer door and push down firmly on the inner drum, then release it quickly. If the drum bounces back and stops immediately, the shocks are likely fine. If the drum continues to bounce several times like a pogo stick, the shock absorbers have lost their dampening ability and need to be replaced.
What causes a loud roaring sound during the spin cycle?
A loud noise that sounds like a jet engine taking off is usually a sign of failing tub bearings or a broken spider arm assembly. This often happens when the water seal fails, allowing water to rust the bearings, or when the aluminum spider arm corrodes. If you notice this sound accompanied by a wobbly drum, the machine is facing a major mechanical failure that requires advanced repair.
How do I run calibration mode on my LG washer?
Calibration mode allows the washer to reset its weight sensors for a smoother spin. Ensure the drum is completely empty and the machine is off. Turn the power on and immediately press and hold the designated buttons (commonly “Temp” and “Delay End,” or “Spin” and “Soil”) and then press the Start/Pause button. The drum will rotate for a few minutes to measure its own weight and balance, then display “End” when the process is complete.


