If you are noticing water left in the drum after a cycle or seeing specific error codes, learning how to clean drain pump on Samsung Washer is the immediate solution you need. Failing to perform this routine maintenance can lead to significant mechanical failures, bad odors, and interrupted laundry schedules.
As a Senior SEO Specialist and appliance maintenance expert, I have compiled this comprehensive guide to help you navigate the process safely and effectively. This article will walk you through the necessary steps, identify the tools required, and explain the technical reasons why the debris filter becomes clogged. By understanding the mechanics of your appliance, specifically the interaction between the pump impeller and the filtration system, you can extend the lifespan of your machine and avoid costly repair bills.
Understanding the Importance of the Drain Pump Filter
Before diving into the manual labor, it is crucial to understand the function of the drain pump filter, often referred to as the debris filter. In a standard front load washer, the water used to rinse your clothes must exit the drum through a drainage system. Before this water reaches the house drain, it passes through a filter designed to catch foreign objects.
Coins, buttons, hair, lint, and other small items are frequently left in pockets. Without a filter, these objects would travel directly into the pump, potentially damaging the pump impeller or burning out the motor. When this filter accumulates too much lint and debris, the flow of water is restricted, leading to severe drainage issues.
Recognizing the Symptoms
Your Samsung washer is equipped with sophisticated sensors that alert you when the drainage system is compromised. The most common indicators that you need to clean the pump include:
- 5C Error Code: This is the most prevalent notification regarding drainage. It signifies that the water is not draining fast enough or at all.
- ND Error Code: Standing for “No Drain,” this code appears when water remains in the drum after the cycle should have finished.
- Excessive Vibration: If the pump is struggling to push water through a clog, the machine may vibrate more than usual.
- Unpleasant Odors: Standing water or rotting organic matter caught in the filter can generate a mildew smell.
- Wet Clothes: If the spin cycle completes but clothes are still soaking wet, the pump failed to evacuate the water effectively.
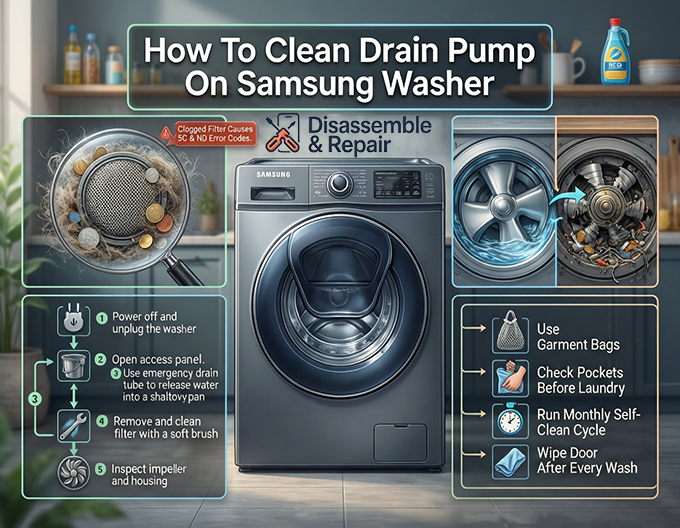
Step-by-Step Guide: How to clean drain pump on Samsung Washer
Cleaning the pump filter is not difficult, but it requires precision and preparation to prevent water damage to your floor. Follow this detailed protocol to restore your machine’s functionality.
Phase 1: Preparation and Safety
Safety is paramount when working with electrical appliances. Before touching any internal components, ensure the washing machine is powered off and unplugged from the wall outlet. If the machine is hardwired, switch off the circuit breaker.
Next, gather the necessary materials:
- Shallow pan (baking sheets or low-profile containers work best).
- Old towels or rags (to catch spills).
- A small soft brush (like a toothbrush).
- Flashlight.
- Mild soap and warm water.
Phase 2: Locating and Accessing the Pump
On most Samsung front load washers, the debris filter is located behind a small rectangular access panel on the front of the machine, typically at the bottom right corner.
- Open the Access Panel: Press against the cover to pop it open. Some models may require a coin or a flathead screwdriver to gently pry it open.
- Inspect the Area: Inside, you will see two main components: a small rubber hose (the emergency drain tube) and a large circular cap (the debris filter).
Phase 3: Draining the Residual Water
Do not unscrew the large circular cap yet. If you do, a significant amount of water will flood your floor. You must perform a manual drain first using the emergency tube.
- Position Your Tools: Place your towels on the floor directly under the access panel. Place the shallow pan on top of the towels.
- Deploy the Emergency Drain Tube: Unclip the small rubber tube and pull it forward. It should extend several inches.
- Remove the Cap: Hold the tube over the shallow pan. Twist and pull the cap off the end of the emergency drain tube.
- Drain the Water: Allow the water to flow into the pan. This process requires patience. The tube is narrow, and if the drum is full, it may take 10 to 15 minutes to drain completely.
- Manage the Flow: If your pan fills up, place the cap back on the tube to stop the flow, empty the pan, and repeat the process until no more water comes out.
- Secure the Tube: Once drained, replace the cap on the emergency drain tube firmly and clip it back into its holding bracket.
Phase 4: Removing and Cleaning the Debris Filter
Now that the water is evacuated, it is safe to remove the main filter.
- Unlock the Filter: Grip the large circular cap of the debris filter. Turn it counter-clockwise (to the left). It may be stiff if it hasn’t been opened in a long time.
- Remove the Filter: Pull the filter straight out. A small amount of residual water may splash out, which your towels will catch.
- Inspect for Debris: Examine the filter mesh. You will likely find a buildup of lint and debris, hair, coins, or bobby pins.
- Clean the Filter: Rinse the filter under warm running water. Use a soft brush to scrub away any slime or buildup. Ensure the threads on the cap are clean.
- Clean the Pump Housing: Use your flashlight to look inside the empty hole (the pump housing) where the filter was sitting.
- Check the Impeller: Inside the housing, at the back, is the pump impeller (it looks like a small fan blade). Reach in and ensure it spins freely. Sometimes debris bypasses the filter and wraps around the impeller, preventing it from turning. Remove any obstructions found here.
Phase 5: Reassembly and Testing
Reassembling the unit correctly is vital to prevent leaks.
- Check the Rubber Seal: Before inserting the filter, inspect the black rubber seal (washer) on the filter cap. It should be intact and free of grit. A dirty seal is the primary cause of leaks after maintenance.
- Insert the Filter: Slide the clean debris filter back into the housing.
- Tighten the Filter: Turn the knob clockwise (to the right) until it is tight. Do not overtighten with tools; hand-tight is sufficient, but it must be secure.
- Close the Panel: Snap the access panel cover back into place.
- Test for Leaks: Plug the washer back in and turn it on. Run a “Rinse and Spin” cycle. Watch the access panel area for any signs of water leaking. If you see water, pause the cycle, drain the machine via the emergency tube again, and reseat the filter.
Troubleshooting Common Obstacles
Even with a guide, you may encounter specific issues during this process. Here are professional solutions to common roadblocks.
The Filter is Stuck and Won’t Turn
If you have not cleaned the pump in years, the filter may be seized due to mineral deposits or jammed debris.
- Do not force it with pliers, as the plastic handle can break easily.
- Try wiggling it back and forth gently to loosen the debris.
- If it remains stuck, the entire drain pump assembly may need to be accessed from the inside of the machine (requiring the removal of the front panel), which usually requires a service technician.
Water Leaks After Cleaning
If water drips from the filter area after you have finished:
- Debris on Threads: Remove the filter again and wipe the threads of the housing and the cap with a clean cloth. Even a single strand of hair can break the watertight seal.
- Damaged Seal: Inspect the rubber seal for cracks or tears. If the seal is damaged, you will need to purchase a replacement filter assembly.
- Cross-Threading: Ensure you didn’t screw the cap on crooked. It should turn smoothly until it hits the locking point.
Preventative Maintenance: Keeping the 5C Error Code Away
Understanding how to clean drain pump on Samsung Washer is reactive; preventing the clog is proactive. To minimize the frequency of this chore and protect your front load washer, implement these habits:
Use Garment Bags
Small items like baby socks, thongs, and handkerchiefs are the most common items to slip between the gasket and the drum, eventually ending up in the pump filter. Wash these small items in a zippered mesh laundry bag.
Check Pockets Rigorously
Coins, screws, and paper clips can cause catastrophic damage to the pump impeller. Establish a strict rule to empty all pockets before clothes enter the laundry room.
Read more Samsung Tub Clean cycle instructions
Monthly Maintenance Washes
Run a “Self Clean” or “Pure Cycle” once a month without clothes. This uses hot water and high agitation to flush out lint and debris that may be accumulating in the internal hoses before it solidifies into a clog.
Wipe the Door Gasket
After every wash, wipe down the large rubber door seal. Small items often get trapped here. If not removed, they will eventually migrate down to the drain pump filter.
The Role of Detergent in Drainage Issues
Surprisingly, the type of detergent you use can contribute to drainage issues. Samsung High Efficiency (HE) washers require HE detergent. Using regular detergent, or using too much HE detergent, creates excessive suds.
The drain pump is designed to move water, not thick foam. Excess suds can trigger the pressure sensor to believe the tub is full when it isn’t, or simply cause the pump to cavitate (spin without moving water). Over time, soap residue builds up in the pump housing, acting as a glue for lint and hair, leading to faster clogging and the dreaded ND error code. Always follow the manufacturer’s recommended detergent amounts.
When to Call a Professional
While cleaning the debris filter is a user-serviceable task, there are scenarios where professional help is required:
- Electrical Issues: If the machine does not drain, but the filter is clean and the impeller spins freely, the drain pump motor itself may have failed electrically.
- Internal Blockages: Sometimes the blockage is not in the filter, but deep inside the corrugated drain hose leading from the tub to the pump.
- Broken Impeller: If you check the pump impeller and find the blades are snapped off or the shaft wobbles significantly, the pump unit needs replacement.
Conclusion
Knowing how to clean drain pump on Samsung Washer is a fundamental skill for any front-load washer owner. It resolves the majority of drainage-related error codes like the 5C error code and keeps your appliance running efficiently.
By performing this simple maintenance task every 6 to 8 weeks, you prevent foul odors, protect your clothes from gray water exposure, and extend the operational life of your washing machine. Remember, the key to a long-lasting appliance is not just how well it is built, but how well it is maintained. Take twenty minutes today to check your filter; your washing machine will thank you.
Read more How to level Samsung washing machine
Frequently Asked Questions
How often should I clean the drain pump filter on my Samsung washer?
To maintain optimal performance and prevent drainage issues, you should clean the debris filter every 6 to 8 weeks. If you do a high volume of laundry or frequently wash heavily soiled items, you may want to check it more often to avoid the accumulation of lint and debris.
What do the 5C and ND error codes mean?
Both codes indicate a drainage problem. The 5C error code specifically means the water is not draining fast enough or is completely blocked. The ND error code stands for “No Drain,” which typically appears when the machine is unable to evacuate water from the drum at the end of a cycle.
How can I prevent water from flooding my floor while cleaning the filter?
You must use the emergency drain tube located next to the filter cap before opening the filter itself. By placing a shallow pan under this tube and removing its small cap, you can manually drain the residual water in a controlled manner. Only unscrew the large debris filter cap once the water has stopped flowing from the emergency tube.
What should I do if the debris filter is stuck and will not turn?
If the filter is seized due to mineral deposits or jammed debris, do not use pliers or excessive force, as the plastic handle may break. Try gently wiggling it back and forth to loosen the obstruction. If it remains stuck, you may need to contact a service technician to access the pump assembly from inside the machine.
Can using too much detergent cause drainage issues?
Yes. Using non-HE detergent or excessive amounts of HE detergent creates too many suds. The drain pump is designed to move water, not thick foam. Over time, soap residue can build up in the pump housing, trapping lint and hair more easily and eventually leading to clogs and error codes.