Excess humidity is the silent killer of modern bathrooms. Without proper ventilation, moisture seeps into drywall, peels paint, and creates the perfect breeding ground for mold. Learning How to Install a Bathroom Exhaust Fan is one of the most effective ways to protect your home’s structural integrity and air quality.
Whether you are upgrading a noisy old unit or cutting into a ceiling for the first time, this project is manageable with the right preparation. This guide covers the electrical, mechanical, and venting requirements to ensure your bathroom remodel is up to code and fully functional.
Key Takeaways:
- Safety First: Always shut off power at the breaker panel before cutting into walls or handling wires.
- Venting is Crucial: Never vent air into an attic or crawlspace. Moisture must exit the home completely to prevent rot.
- CFM Matters: Ensure your fan power (CFM) matches the square footage of your bathroom.
- Duct Runs: Keep ductwork as straight and short as possible for maximum efficiency.
Pre-Installation: Planning and Tools
Before cutting drywall, you must assess your current setup. Are you replacing an existing unit or installing a new one where none existed? The scope of work changes significantly depending on whether you have attic access.
Necessary Tools and Materials
Success relies on having the right gear on hand. Gather these items before starting:
- Tools: Drywall saw, power drill, stud finder, voltage tester, wire strippers, HVAC tape, screwdriver set.
- Materials: Exhaust fan unit, 4-inch flexible or rigid ducting, vent cap (roof or wall), wire nuts, Romex cable (if running new power).
Choosing the Right Location
Ideally, install the fan near the shower or tub, as this is the primary source of steam. Use a stud finder to locate ceiling joists. The fan housing must typically be mounted directly to a joist for stability.
See more: Tools for Bathroom Window Fan Installation
Step-by-Step Installation Guide
The process of How to Install a Bathroom Exhaust Fan involves three distinct phases: physical mounting, venting, and wiring.
Step 1: Cutting the Intake Hole
If this is a new installation, use the template provided by the manufacturer. Tape it to the ceiling between joists. Trace the outline with a pencil.
Drill a starter hole in one corner inside the line. Use your drywall saw to carefully cut along the traced line. Wear safety goggles and a dust mask; gypsum dust is abrasive and spreads quickly.
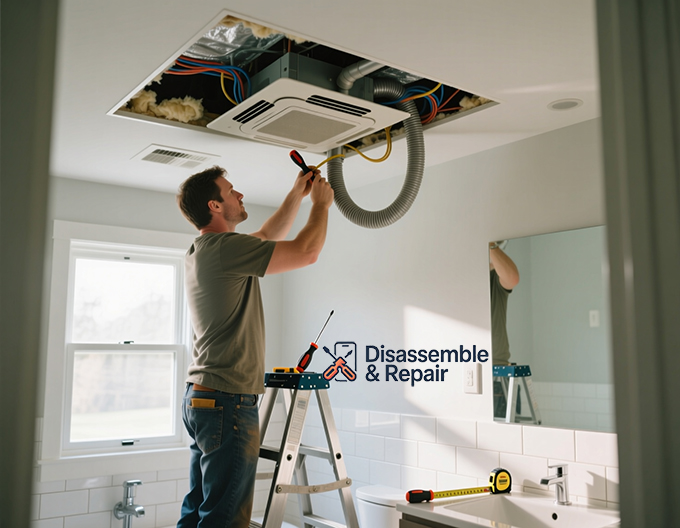
Step 2: Mounting the Fan Housing
Insert the fan housing into the ceiling hole. Ensure the discharge port (where the air comes out) is facing the direction of your exterior vent.
Secure the housing to the ceiling joist using the screws provided. Most modern fans have brackets that expand to hit the joists on both sides. Ensure the bottom edge of the fan housing is flush with the ceiling drywall.
Step 3: Installing the Ductwork
This is the most critical step for performance. Connect a 4-inch duct to the fan’s discharge port. Secure it with HVAC tape or a mechanical clamp.
Run the ducting to the exterior. You have two main options: through the roof or through a sidewall. Ideally, the run should be as short and straight as possible. Every bend reduces the fan’s ability to move air.
Warning: Never use duct tape for this step. It dries out and fails over time. Use foil HVAC tape or specialized clamps.
Step 4: Electrical Wiring
Turn off the power at the main breaker panel. Use a non-contact voltage tester to confirm the power is dead before touching any wires.
Open the junction box on the fan housing. You will typically see black (hot), white (neutral), and green/copper (ground) wires. Connect the house wires to the fan wires color-to-color using wire nuts.
- Connect White to White (Neutral).
- Connect Black to Black (Hot).
- Connect Ground to Green/Bare Copper.
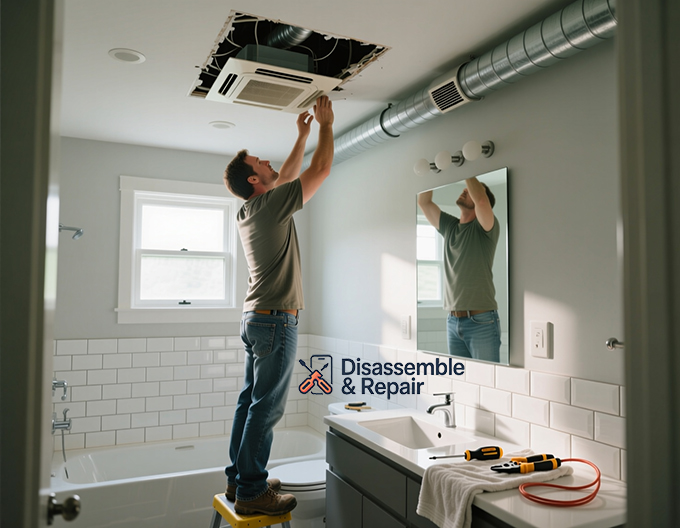
Step 5: Final Assembly
Once wired and ducted, replace the junction box cover. Install the fan blower motor if it was removed during housing installation. Finally, attach the decorative grille. It usually attaches with tension springs that slip into slots in the housing.
Turn the power back on at the breaker and test the fan. A simple test is holding a single square of toilet paper up to the grille; the suction should hold it in place.
Common DIY Mistakes to Avoid
Even experienced renovators make errors during bathroom exhaust fan installation. Avoiding these ensures longevity and safety.
- Venting into the Attic: This simply moves the mold problem from the bathroom to the attic. The moist air will condense on roof sheathing, causing rot.
- Using Undersized Wiring: Ensure your wire gauge matches the amperage of the circuit (usually 14-gauge for 15-amp circuits).
- Ignoring Insulation: If you are in a cold climate, insulate the ductwork in the attic. This prevents condensation from forming inside the duct and dripping back into the fan.
Cost vs. Effort: DIY or Hire a Pro?
Should you tackle this yourself? It depends on your electrical confidence and attic accessibility.
| Factor | DIY Installation | Professional Installation |
|---|---|---|
| Average Cost | $150 – $300 (Fan + Materials) | $450 – $800+ (Labor + Materials) |
| Time Required | 4 – 8 Hours | 2 – 4 Hours |
| Skill Level | Intermediate (Electrical/Carpentry) | Expert |
| Risk Factor | Potential for wiring errors or poor venting | Insured and Code-Compliant |
Conclusion
Proper ventilation is not optional; it is a requirement for a healthy home. Mastering How to Install a Bathroom Exhaust Fan allows you to control moisture, prevent expensive water damage, and improve indoor air quality. While the electrical and venting aspects require attention to detail, the result is a functional upgrade that lasts for years.
Post-Installation Checklist
Before calling the project complete, run through this final check:
- Suction Test: Does the fan hold a tissue against the grille?
- Sound Check: Is the fan rattling? (Tighten mounting screws if yes).
- Vent Check: Go outside while the fan is running. Can you feel air coming out of the exterior vent hood?
- Seal Check: Is the gap between the drywall and the fan housing sealed to prevent attic air leakage?
Is your current bathroom setup actually venting moisture effectively, or are you just recirculating damp air?

Frequently Asked Questions About Bathroom Fan Installation
Do bathroom exhaust fans need to be vented outside?
Yes. You must vent moist air to the home’s exterior via a roof or wall cap. Recirculating air or venting into an attic causes mold growth, drywall damage, and structural wood rot.
Where should a bathroom fan be positioned?
Place the fan directly above or near the shower or bathtub to capture steam at the source. Secure the housing to a ceiling joist and aim the discharge port toward the exterior vent to keep ductwork short and straight.
Can I vent a bathroom fan into the attic?
No. Venting into an attic moves moisture to the roof sheathing, creating condensation that leads to rot and mold. Always use insulated ducting to transport air completely outside the building envelope.
How hard is it to install a bathroom fan?
Installation is an intermediate DIY task taking 4 to 8 hours. It requires cutting drywall, simple electrical wiring (connecting hot, neutral, and ground), and running 4-inch rigid or flexible ducting. Always turn off the main breaker before starting to ensure safety.


