Learning how to install bathroom exhaust fan in attic spaces is a critical home improvement project that prevents structural damage caused by excess moisture. Without proper ventilation, the humid air from your daily showers can linger, leading to peeling paint, warped wood, and hazardous mold growth. This guide provides a comprehensive walkthrough for homeowners and DIY enthusiasts to execute this installation professionally and safely.
Phase 1: Planning and Sizing Your Fan
Before cutting into your ceiling, you must select a unit with the correct power and features.
Calculating the CFM Rating
The effectiveness of your fan is measured by its CFM rating (Cubic Feet per Minute). To determine the minimum requirement for your bathroom:
- Standard Rule: You need 1 CFM per square foot of floor area.
- Example: A 70-square-foot bathroom requires at least a 70 CFM fan.
- Fixture Add-ons: If you have a jetted tub, add 100 CFM. For a separate enclosed toilet area, add 50 CFM.
Essential Tools and Materials
- Drywall saw or reciprocating saw
- Power drill and driver bits
- Junction box (often built into the fan housing)
- Insulated ducting (4-inch or 6-inch diameter)
- Roof vent cap or Soffit vent hood
- Roof flashing and roofing cement (for roof venting)
- Foil tape (not duct tape)
- Wire strippers and voltage tester
Phase 2: How to Install Bathroom Exhaust Fan in Attic (Step-by-Step)
This section covers the physical installation and venting process. Safety is paramount; always turn off the circuit breaker before starting any work.
Step 1: Mark and Cut the Ceiling
Locate a position between two ceiling joists. Ideally, this spot should be centered in the room or directly above the shower.
- Use a stud finder to locate the joist edges.
- Hold the fan housing against the ceiling and trace the outline.
- Drill a pilot hole at the corner of your outline.
- Use a drywall saw to cut along the line. Tip: Wear a dust mask and safety goggles, as falling gypsum dust is inevitable.
Step 2: Mount the Fan Housing
From inside the attic:
- Insert the fan housing into the hole.
- Extend the mounting brackets until they contact the joist on both sides.
- Secure the brackets to the joists using wood screws. Ensure the bottom edge of the fan housing is flush with the bathroom ceiling drywall.
Step 3: Connect the Ductwork
This is the most critical step for mold prevention. You must transport the moist air outside, never just into the attic space.
- Insulated Ducting: Use insulated ducting rather than plain flexible hose. The insulation keeps the warm exhaust air from cooling down too quickly as it travels through the cold attic. This prevents condensation from forming inside the duct and dripping back into the fan motor or ceiling.
- Duct Path: Keep the duct run as straight and short as possible to maintain airflow efficiency.
Step 4: External Venting Options
You have two primary choices for expelling the air:
Option A: Roof Vent (Recommended)
Venting through the roof allows hot air to rise naturally and exit.
- Drill a locator hole through the roof from inside the attic.
- From the roof, cut a hole for the vent cap using a reciprocating saw.
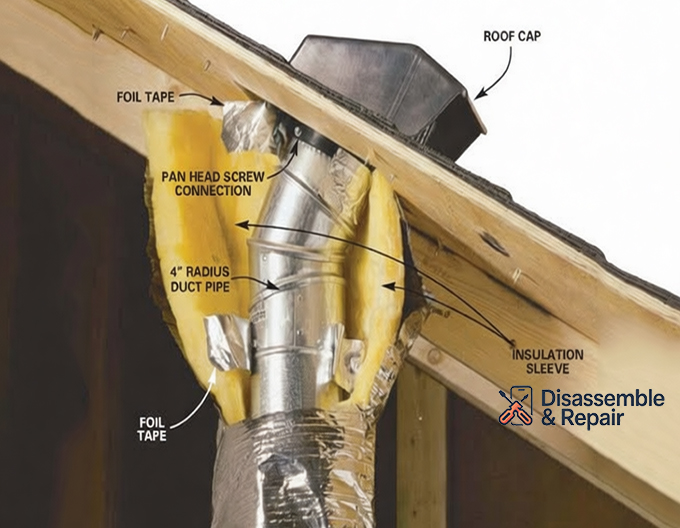
- Install roof flashing under the upper shingles and over the lower shingles to create a watertight seal.
- Attach the vent cap and seal all edges generously with roofing cement.
Option B: Soffit Vent
If roof access is difficult, you can vent through the soffit (the underside of the roof overhang).
- Cut a hole in the soffit board between rafters.
- Install a soffit vent hood.
- Warning: Ensure the vent hood is powerful enough to shoot the air away from the house. If the air lingers, it can be drawn back into the attic through the soffit intake vents, defeating the purpose.
Phase 3: Wiring and Final Assembly
Electrical Safety and Connections
Most modern fans have a built-in junction box. If you are replacing a light fixture, you can often use the existing wiring.
Wiring Diagram Description:
- Switch Loop: Ensure power runs from the switch to the fan.
- Connections:
- Black Wire (Hot): Connect the house black wire to the fan’s black wire.
- White Wire (Neutral): Connect the house white wire to the fan’s white wire.
- Green/Bare Wire (Ground): Connect the house ground wire to the green grounding screw or green wire on the fan housing.
- Cable Clamp: Secure the incoming romex cable to the fan housing with a cable clamp to prevent strain on the connections.
Finishing the Installation
- Backdraft Damper: Ensure the backdraft damper (a small flap at the fan’s exhaust port) moves freely. This flap prevents cold outside air from entering the bathroom when the fan is off.
- Seal Gaps: Use caulk or expanding foam to seal the gap between the drywall and the fan housing in the attic. This air-sealing step stops attic dust from entering the bathroom and improves fan efficiency.
- Install Grille: Go back to the bathroom, plug the fan motor in (if required), and snap the decorative grille into place.
Preventing Common Issues
- Condensation Drips: If you live in a cold climate, water dripping from the fan is usually due to uninsulated ducting. The warm bathroom air hits the cold duct, turns to water, and runs back down. Upgrading to high-R-value insulated ducting fixes this.
- Noise: If the fan is noisy, check that it is securely screwed to the joist and that the duct isn’t kinked.
- Mold Prevention: Run the fan for at least 20 minutes after every shower. Installing a timer switch is an excellent way to ensure moisture is fully evacuated without having to remember to turn the fan off.
By following this guide on how to install bathroom exhaust fan in attic, you ensure a healthy, moisture-free environment for your home. Proper venting through a roof vent and the use of quality materials like insulated ducting will provide years of trouble-free operation.
Frequently Asked Questions
How do I determine the correct size fan for my bathroom?
The power of a bathroom fan is measured in CFM (Cubic Feet per Minute). As a standard rule, you need 1 CFM for every square foot of floor space. For example, a 70-square-foot bathroom requires at least a 70 CFM fan. If you have additional fixtures like a jetted tub or a separate enclosed toilet, you should add an extra 50 to 100 CFM to your total.
Is it okay to vent the exhaust fan directly into the attic?
No, you should never vent a bathroom fan into the attic space. Discharging moist air into the attic leads to condensation on the rafters and roof deck, which causes wood rot and hazardous mold growth. The exhaust must always be piped to the exterior of the house using a dedicated roof vent or soffit vent.
Why is water dripping from my fan housing during the winter?
Dripping is usually caused by condensation forming inside the ductwork. When warm, moist air from the bathroom travels through a cold attic, it cools down and turns back into liquid water. To prevent this, use high-R-value insulated ducting and ensure the duct path is as straight as possible to move the air out quickly.
How long should I leave the fan running after a shower?
To ensure all moisture is completely evacuated from the room and the ductwork, you should run the fan for at least 20 minutes after every shower. Installing a timer switch is a highly recommended upgrade, as it allows the fan to clear the air and shut off automatically without manual intervention.
What is a backdraft damper and why is it important?
A backdraft damper is a small flap located at the fan’s exhaust port. It is designed to open when the fan is running to let air out, and close when the fan is off to prevent cold outside air from entering your home. During installation, you must ensure this flap moves freely and isn’t blocked by tape or debris.