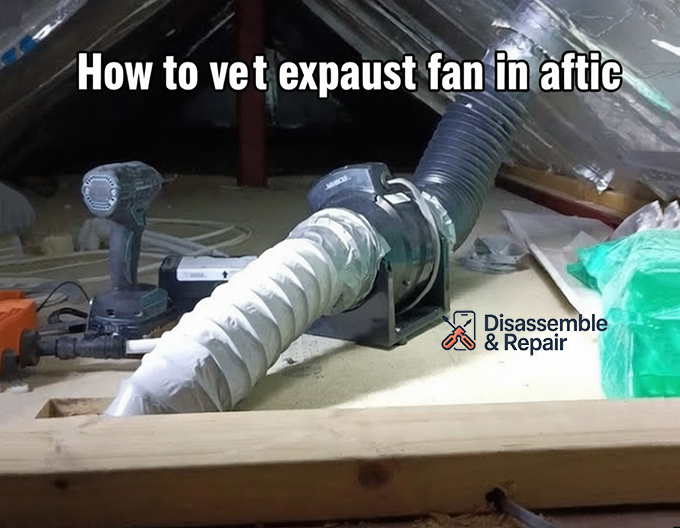
Learning how to vent exhaust fan in attic spaces correctly is a critical home improvement task that protects your property from severe moisture damage. Many homeowners mistakenly believe that simply venting a bathroom exhaust fan into the open attic space is sufficient, but this practice can lead to structural rot, compromised insulation, and hazardous health conditions.
A bathroom exhaust fan serves a singular, vital purpose: to remove warm, humid air generated by showers and baths and transport it completely outside the home. When this moist air is dumped into an attic, it encounters cooler surfaces like the roof deck and rafters. This temperature clash creates condensation, turning your attic into a breeding ground for mold and mildew. To ensure your home meets building codes and remains healthy, you must establish a continuous, sealed pathway from the bathroom ceiling to the outdoors.
Why Proper Venting is Non-Negotiable
Before diving into the installation process, it is essential to understand the mechanics of attic ventilation. Building codes, specifically the International Residential Code (IRC), explicitly prohibit exhausting air into attics, crawl spaces, or eaves.
The Dangers of Improper Venting
When warm air from a bathroom exhaust fan enters a cool attic, it reaches its dew point rapidly. The resulting condensation settles on the underside of the roof deck, trusses, and insulation. Over time, this consistent dampness facilitates mold growth, which can spread to the living areas below and degrade indoor air quality. Additionally, wet wood is susceptible to rot, threatening the structural integrity of your roof.
How to Vent Exhaust Fan in Attic: Choosing the Best Route
There is no “one size fits all” approach to venting. The layout of your attic, the pitch of your roof, and the location of the bathroom determine the most efficient path. Below are the three primary methods, ranked from most to least desirable.
Option 1: Through the Roof (Preferred)
Venting vertically through the roof is often the most direct method. It allows the hot air to rise naturally, reducing the strain on the fan motor. This method involves cutting a hole in the roof deck and installing a specialized roof cap with flashing to prevent leaks.
Option 2: Through a Gable Wall (Excellent Alternative)
If your home has a gable wall (the triangular portion of the wall between the sloping roof edges), venting horizontally through it is a fantastic option. It avoids penetrating the roof shingles, minimizing the risk of future roof leaks. This method is often easier for DIYers as it involves cutting through siding rather than roofing material.
Option 3: Through the Soffit (Least Recommended)
Venting through the soffit vent or eaves is technically possible but risky. The eaves are typically where fresh air enters the attic to ventilate the roof. If you install an exhaust vent here, the natural intake airflow can suck the moist bathroom air right back into the attic. If you must use this route, you need to use a specialized vent cap designed to direct air away from the intake, but it is generally discouraged by professionals.
Essential Materials and Tools
To complete this project professionally, you will need specific materials designed to handle moisture and temperature changes.
- Insulated Ductwork: In colder climates, uninsulated ducts allow the warm exhaust air to cool down before it exits the house, causing water to condense inside the pipe and drip back into the fan. Insulated ductwork maintains the air temperature until it is expelled.
- Flex Duct vs. Rigid Pipe: While rigid metal pipe offers the best airflow, flex duct is commonly used for its ease of installation in tight attic spaces. If using flex duct, ensure it is pulled taut to minimize friction.
- Roof Cap or Wall Hood: This is the termination point outside the house. It must feature a backdraft damper—a small flap that opens when the fan is blowing and closes when it stops—to prevent cold outdoor air from entering the bathroom.
- Foil Tape and Clamps: heavy-duty aluminum foil tape (not standard duct tape) is necessary for sealing joints airtight.
Step-by-Step Installation Guide
This guide assumes you have already mounted the fan housing in the bathroom ceiling and are now working in the attic to connect the venting.
Step 1: Planning the Run
Enter the attic and locate the fan housing. Determine the shortest, straightest path to the exterior. Every bend in the ductwork reduces the fan’s efficiency (measured in CFM – Cubic Feet per Minute). A long, winding run will trap moisture and make the fan louder and less effective.
Step 2: Preparing the Exit Point
For Roof Venting:
- Mark the location on the underside of the roof deck between rafters.
- Drive a long nail up through the shingles so you can locate the spot from the outside.
- From the roof, use a jigsaw to cut a circular hole matching the diameter of your duct.
- Slide the roof cap flange under the upper shingles and over the lower shingles to create a water-shedding overlap.
- Seal generously with roofing tar or silicone.
For Gable Wall Venting:
- Identify a spot on the gable wall between studs.
- Drill a pilot hole and use a hole saw to cut through the siding and sheathing.
- Install the gable vent hood from the outside, caulking around the edges to ensure a watertight seal.
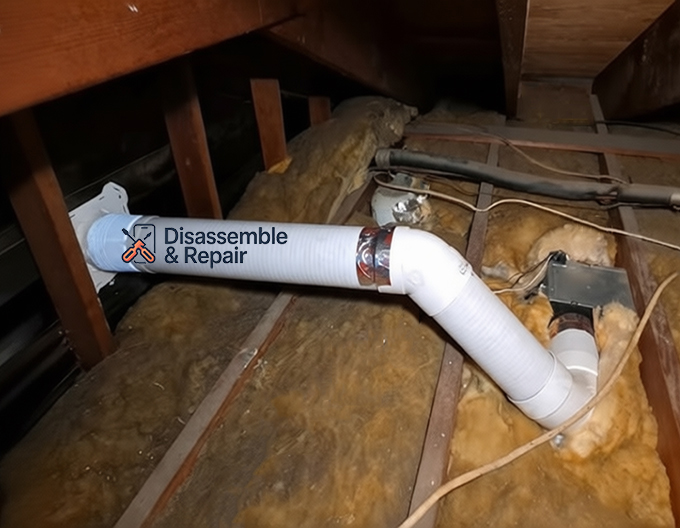
Step 3: Installing the Ductwork
Connect your insulated ductwork to the fan housing outlet. Secure it with a metal clamp and seal the connection with foil tape. Run the duct toward your exit point.
Critical Tip: If the duct runs horizontally, ensure it slopes slightly downward toward the exterior vent (1/4 inch per foot). This ensures that if any condensation does form, it drains outside rather than dripping back into the bathroom fan.
Avoid leaving excess slack in flex duct. Sagging sections create “valleys” where water can accumulate, eventually causing the duct to sag further and potentially burst or leak.
Step 4: Connecting to the Termination Vent
Attach the other end of the duct to the tailpipe of the roof cap or gable wall hood. Again, use a mechanical clamp and foil tape. Verify that the insulation sleeve on the duct is pulled all the way up to the connector to prevent a “cold spot” where condensation could occur.
Addressing Condensation and Insulation
Condensation is the enemy of a successful bathroom exhaust system. Even with a high-quality fan, improper insulation can lead to water damage that mimics a roof leak.
The Role of Insulated Ductwork
In winter, the air inside the duct might be 75°F while the attic air is 20°F. Without insulation, the moisture in the exhaust air will condense into liquid water almost immediately. Insulated ductwork acts as a thermal barrier, keeping the exhaust air warm enough to remain in a gaseous state until it exits the building.
The Backdraft Damper
The backdraft damper is a small but mighty component located at the exit cap (and often on the fan housing itself). Its job is to seal the duct when the fan is off. If this damper is stuck open or missing, cold air will pour down the ductwork into your bathroom, chilling the room and creating condensation on the exterior of the duct in the attic, which can drip onto your ceiling drywall.
Common Mistakes to Avoid
Even experienced DIYers can make errors that compromise the system. Watch out for these pitfalls:
- Venting into Ridge Vents: Some homeowners try to run the duct up to the ridge vent of the roof. This is ineffective because the exhaust air is not forced out; it simply mixes with the attic air, leading to the same moisture problems as venting directly into the open space.
- Using Uninsulated Duct in Cold Zones: If you live in a region with cold winters, standard uninsulated plastic or aluminum hose is effectively a condenser coil. Always use R-rated insulated ducts.
- Crushed Ducts: When running flex duct over joists or around trusses, ensure it isn’t pinched. Constricted ducts reduce airflow, causing the fan to work harder and wear out faster.
- Terminating at the Eaves incorrectly: As mentioned, pushing air out near the soffit vent often results in the air being drawn back in. If you must exit near the eaves, ensure the termination point is several feet away from any intake vents.
Conclusion
Knowing how to vent exhaust fan in attic areas is about more than just moving air; it is about managing moisture and protecting your home’s envelope. By strictly adhering to building codes and directing the airflow through the roof or gable wall, you effectively neutralize the threat of mold growth and water damage.
Remember to prioritize quality materials. The small extra cost for insulated ductwork and a high-quality roof cap with a functional backdraft damper pays for itself by preventing ceiling repairs and mold remediation down the road. Whether you are retrofitting an old fan or installing a new one, a sealed, direct-to-outdoors path is the only professional standard for bathroom ventilation.
Frequently Asked Questions
Can I vent my bathroom exhaust fan directly into the attic if it is a large space?
No. Regardless of the size of your attic, venting moist air into the open space is a violation of the International Residential Code (IRC). Doing so causes warm, humid air to condense on cool surfaces like the roof deck and rafters, which leads to wood rot, mold growth, and compromised insulation. The air must be transported through a sealed duct to the outdoors.
Why is insulated ductwork recommended over standard uninsulated ducts?
Insulated ductwork is essential, especially in colder climates, to prevent condensation. When warm, moist bathroom air travels through a cold attic in an uninsulated pipe, it cools down rapidly and turns back into liquid water. This water can then drip back into the fan motor or onto your ceiling. Insulation acts as a thermal barrier, keeping the air warm until it is safely expelled outside.
Is it acceptable to vent the fan through a soffit or eave?
Venting through the soffit is the least recommended method. Because soffit vents are designed to act as air intakes for the attic’s natural ventilation system, the moist air expelled by the fan is often sucked right back into the attic. If you must use this route, you must install a specialized vent cap that directs the exhaust air far away from any intake vents.
What is a backdraft damper and why do I need one?
A backdraft damper is a small flap located in the roof cap, wall hood, or the fan housing itself. It is designed to open when the fan is running and snap shut when it is off. This prevents cold outdoor air from entering the ductwork and cooling your bathroom, and it also stops pests from entering the system.
How can I ensure my fan maintains its maximum airflow (CFM)?
To keep your fan efficient, plan the shortest and straightest route possible for the ductwork. Avoid unnecessary bends or long, winding runs, as these increase friction and reduce air movement. If you are using flex duct, ensure it is pulled taut and not sagging or pinched, as constricted ducts make the fan louder and less effective at removing moisture.