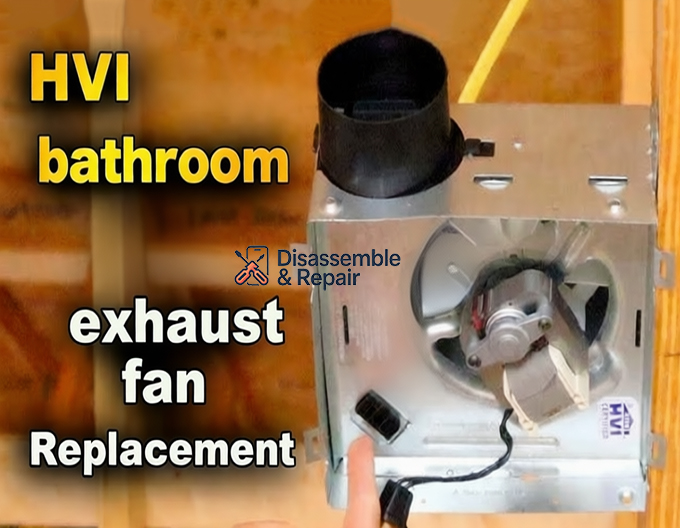
Ensuring a successful HVI bathroom exhaust fan Replacement requires more than just swapping out an old motor; it demands a clear understanding of airflow standards and certification performance. If your current fan is noisy, ineffective, or failing to remove steam, upgrading to a Home Ventilating Institute (HVI) certified model is the single most effective way to guarantee proper ventilation and mold prevention.
Why HVI Certification Matters for Your Bathroom
When you select a replacement fan, the “HVI Certified” label is your only guarantee that the product’s performance claims have been independently tested and verified. Uncertified fans often overstate their capabilities, leading to poor moisture control and potential structural damage.
Home Ventilating Institute certification ensures that the fan has undergone rigorous testing for:
- Airflow performance (CFM): The actual volume of air the fan moves.
- Sound levels (Sones): How loud the fan is when operating.
- Energy efficiency: ensuring the unit meets modern energy conservation standards.
By choosing an HVI-certified unit, you are complying with industry best practices and often local building codes that reference ASHRAE 62.2 standards for residential ventilation.
Sizing Your Replacement Fan: CFM and Static Pressure
The most common mistake during an HVI bathroom exhaust fan Replacement is selecting an undersized unit. To ensure adequate Ventilation capacity, you must calculate the required Cubic Feet per Minute (CFM) rating based on your room size.
Calculating Ventilation Capacity
For bathrooms under 100 square feet, the general rule is 1 CFM per square foot of floor area.
- Example: An 80 sq. ft. bathroom requires a minimum of 80 CFM.
For bathrooms larger than 100 square feet, calculate requirements based on fixtures:
- Toilet: +50 CFM
- Shower: +50 CFM
- Bathtub: +50 CFM
- Jetted Tub: +100 CFM
The Role of Static Pressure
Most consumer-grade fans are rated at a Static pressure of 0.1 inches of water gauge (w.g.). However, in real-world scenarios—especially with long duct runs or multiple elbows—resistance is higher.
- Standard Rating: 0.1″ w.g. (Ideal laboratory conditions).
- Real-World Rating: 0.25″ w.g. (Typical installation with duct resistance).
For the best results, look for an Energy Star rated fan. These models are required to deliver consistent Airflow performance even at higher static pressures (0.25″ w.g.), ensuring your fan works effectively even if your ductwork isn’t perfect.
Understanding Sone Levels for Quiet Operation
Old fans are notorious for sounding like jet engines. This noise is measured in Sone levels.
- 4.0 Sones: Loud, standard for older economy fans.
- 1.0 Sone or less: Considered “quiet” (roughly the sound of a quiet refrigerator).
- < 0.3 Sones: Ultra-quiet, barely audible.
When planning your HVI bathroom exhaust fan Replacement, prioritize a model with a rating of 1.0 Sone or less to encourage regular use. If a fan is too loud, occupants often leave it off, defeating the purpose of Bathroom mold prevention.
Full Unit vs. Replacement Motor Assembly
You don’t always need to rip out the ceiling to fix a bad fan. You generally have two options:
1. Replacement Motor Assembly
If your housing is in good condition and you can find a compatible kit, this is the easiest path. You simply remove the grille, unplug the motor, and snap the new assembly into the existing housing. This is cost-effective but limits you to the performance specs of the old housing design.
2. Full Unit Replacement
This involves removing the entire metal housing from the ceiling. While more labor-intensive, it allows you to:
- Upgrade to a higher CFM rating.
- Install a larger Duct diameter (e.g., upgrading from 3″ to 4″ or 6″), which significantly improves airflow and reduces noise.
- Add modern features like a Humidity sensor or LED lighting.
Step-by-Step Guide to HVI Bathroom Exhaust Fan Replacement
Step 1: Preparation and Safety
Turn off the power at the circuit breaker. Verify the power is off using a non-contact voltage tester. Gather your tools: drywall saw, screwdriver, HVAC tape, and wire strippers.
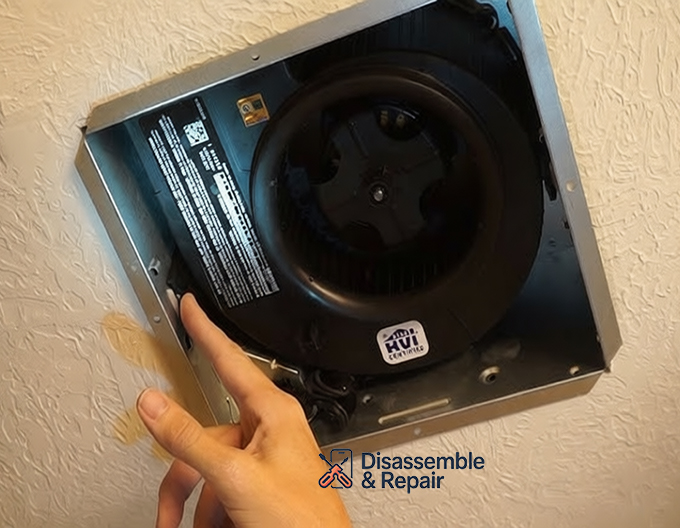
Step 2: Remove the Old Unit
Remove the grille and unplug the motor. If replacing the full unit, disconnect the wiring from the junction box inside the housing. Remove the screws fastening the housing to the joist. You may need to visit the attic to disconnect the ductwork and remove the housing completely.
Step 3: Ductwork Inspection
Check your existing Duct diameter. Older homes often use 3-inch ducts, while modern high-performance fans require 4-inch or 6-inch ducts. Adapting a powerful fan to a small duct increases Static pressure and noise while killing performance. If possible, upgrade the ductwork to match the new fan’s outlet size. Ensure the duct run is as straight and short as possible.
Step 4: Install the New Housing
Secure the new housing to the ceiling joist. Most modern HVI bathroom exhaust fan Replacement kits come with telescoping mounting brackets for easy installation between joists. Ensure the bottom edge of the housing is flush with the ceiling drywall.
Step 5: Connect Wiring and Sensor
Connect the wiring according to the manufacturer’s diagram (typically black to black, white to white, green to ground).
- Humidity Sensor: If your new fan includes a humidity sensor, you may need a constant “hot” wire so the sensor can run the fan automatically even when the wall switch is off. Check the specific wiring diagram for “sensing” vs. “switched” lines.
Step 6: Final Assembly and Testing
Connect the ductwork using HVAC foil tape (do not use standard duct tape, which dries out and fails). Install the blower assembly into the housing and plug it in. Restore power and test.
- The Paper Test: Turn the fan on and hold a single square of toilet paper up to the grille. A properly functioning fan with adequate Airflow performance should hold the paper firmly against the grille.
Advanced Considerations: ASHRAE 62.2 and Smart Controls
Meeting ASHRAE 62.2 Standards
ASHRAE 62.2 standards are the benchmark for residential indoor air quality. They may require your bathroom fan to run continuously at a low speed to provide whole-house ventilation, boosting to a higher speed when the bathroom is in use. Many modern DC-motor fans are designed specifically for this dual purpose, offering adjustable speed selectors directly on the fan body.
Automation for Mold Prevention
The most effective Bathroom mold prevention strategy is removing human error. Installing a fan with an integrated Humidity sensor ensures the fan runs until moisture levels drop to a safe range, regardless of how long the shower lasted. Alternatively, you can install a wall-mounted humidity sensing switch compatible with your HVI fan.
Conclusion
Investing in a proper HVI bathroom exhaust fan Replacement is one of the best upgrades you can make for your home’s longevity and air quality. By paying attention to the CFM rating, Sone levels, and Duct diameter, you ensure that your new system operates quietly and efficiently. Always look for the Home Ventilating Institute certification label to ensure you are getting the performance you paid for, and consider Energy Star rated models to keep utility costs low while maintaining superior static pressure performance.
Frequently Asked Questions
What does HVI certification actually guarantee?
The Home Ventilating Institute (HVI) certification is your assurance that a fan’s performance claims—specifically airflow (CFM), sound levels (Sones), and energy efficiency—have been independently tested and verified. Choosing an HVI-certified model ensures you are getting the actual ventilation power needed to meet building codes and prevent mold, rather than relying on unverified manufacturer claims.
How do I calculate the correct CFM for my bathroom size?
For bathrooms smaller than 100 square feet, the standard rule is 1 CFM per square foot of floor space (e.g., an 80 sq. ft. bathroom needs an 80 CFM fan). For larger bathrooms, you should size the fan based on the fixtures: add 50 CFM each for a shower, bathtub, or toilet, and 100 CFM for a jetted tub.
What is a Sone rating and which level should I look for?
Sones are a measurement of sound; the lower the rating, the quieter the fan. A rating of 4.0 Sones is quite loud, similar to a loud office or an older economy fan. A rating of 1.0 Sone or less is considered quiet (similar to a quiet refrigerator), and ratings below 0.3 Sones are ultra-quiet and nearly inaudible during normal use.
Can I install a high-performance fan using my old 3-inch ductwork?
While possible with an adapter, it is not recommended. Modern high-performance fans are designed for 4-inch or 6-inch ducts. Forcing a high-CFM fan through a 3-inch duct increases static pressure, which significantly reduces airflow and increases noise. For the best results, you should upgrade your ductwork to match the new fan’s outlet size.
How can I tell if my newly installed fan is working correctly?
You can perform a simple “paper test.” Turn the fan on and hold a single square of toilet paper up to the intake grille. If the fan is providing adequate airflow performance, the suction should be strong enough to hold the paper firmly against the grille. If the paper falls, you may have an issue with duct resistance, an undersized motor, or a blockage.