Is your LG washer leaking from drain pump filter areas, leaving puddles on your laundry room floor? This specific type of leak is a common issue for front-load washing machine owners, but it is often simple to diagnose and repair without professional help. A leaking drain filter can be messy and alarming, yet it usually points to a few specific components that may need cleaning, adjustment, or replacement. By understanding the anatomy of your appliance’s drainage system, you can stop the water damage and get your washer back to peak performance.
In this comprehensive guide, we will explore the root causes of these leaks, how they relate to the infamous OE error code, and provide a detailed step-by-step process to fix the problem.
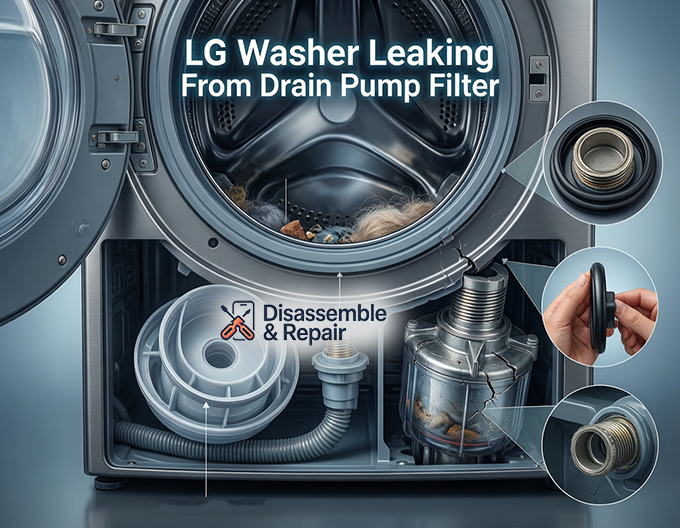
Why Is Your LG Washer Leaking from Drain Pump Filter?
Finding water pooling near the bottom left corner of your machine is the hallmark sign of an LG washer leaking from drain pump filter components. This area houses the drain pump assembly, which is responsible for expelling water from the drum during the spin and drain cycles. Unlike leaks from door gaskets or inlet hoses, a leak here is almost always mechanical or maintenance-related.
Read more LG washing machine leaking from bottom when draining
The Role of the Debris Filter
The debris filter (also known as a coin trap) is designed to catch foreign objects like lint, coins, buttons, and hair before they can enter the impeller of the drain pump. If this filter becomes clogged, the internal pressure can rise, forcing water past the seals. Conversely, if the filter is not tightened correctly after a routine cleaning, water will escape through the threaded seal.
Damaged O-Rings and Rubber Gaskets
The most frequent culprit for a sudden leak is the O-ring or rubber gasket situated on the filter cap. This circular rubber seal creates a watertight barrier between the plastic filter cap and the pump housing. Over time, this rubber can dry out, crack, or become compressed, losing its ability to seal effectively. Additionally, during cleaning, it is easy to accidentally dislodge the O-ring or pinch it when screwing the cap back on, leading to a steady drip or a significant flow of water.
Read more LG washing machine FL error
Cracked Pump Housing
In rare cases, the leak may not be coming from the cap itself but from the pump housing. This plastic casing can develop hairline cracks due to age, vibration, or freezing temperatures if the washer is located in an unheated garage. A cracked housing will require a complete replacement of the drain pump assembly.
Understanding the OE Error Code
Often, an LG washer leaking from drain pump filter housings will be accompanied by an OE error code on the display panel. The OE code stands for “Water Outlet Error,” indicating that the machine is unable to drain water within a specific time limit.
While the code itself usually points to a clog in the drain hose or a failing pump, it is intimately connected to leaks in the filter area. If the debris filter is completely blocked, the pump works harder, potentially causing back-pressure leaks. Conversely, if you have recently opened the filter to clear an OE error and did not reseal it perfectly, you may solve the error code only to create a water leak.
Addressing an OE error code almost always involves opening the maintenance access panel. This makes it the perfect time to inspect the seals and housing to ensure that fixing the drainage problem doesn’t inadvertently cause a flooding issue.
Step-by-Step Repair Guide
Fixing a leak in this area requires precision and patience. Follow these steps to safely inspect and repair your washer.
1. Safety and Water Damage Prevention
Before touching any internal components, unplug the washing machine from the electrical outlet. Water and electricity are a dangerous combination. To ensure water damage prevention, place old towels and a shallow baking sheet or low-profile pan directly in front of the washer. Even if the drum looks empty, the pump housing will always contain residual water.
2. Open the Maintenance Access Panel
Locate the small square or rectangular door at the bottom left of the front-load washing machine. This is the maintenance access panel. You can usually open it by pressing a release tab or prying it gently with a flat-head screwdriver. Once open, you will see two main components: a small rubber hose (the emergency drain hose) and a large round plastic cap (the filter cap).
3. Drain the Residual Water
Do not unscrew the filter cap immediately, or water will flood out uncontrollably. Instead:
- Unclip the small emergency drain hose.
- Remove the small plug at the end of the hose while holding it over your shallow pan.
- Allow the water to drain completely. You may need to empty the pan multiple times.
- Once the flow stops, replace the plug firmly and clip the hose back into place.
4. Remove and Inspect the Debris Filter
Now that the water is drained, turn the large filter cap counter-clockwise to unscrew it. Pull the debris filter straight out.
- Check for Debris: Clean out any lint, coins, or sludge from the filter itself and the inside of the pump housing.
- Inspect the Housing: Use a flashlight to look inside the threaded area of the pump housing. Ensure there are no foreign objects stuck in the threads that could prevent a tight seal.
5. Evaluating the O-Ring and Seal
Examine the black rubber O-ring located at the base of the filter cap threads.
- Position: Is the O-ring seated flat in its groove? It should not be twisted or bunching up.
- Condition: Look for small tears, flat spots, or brittleness. If the rubber feels hard like plastic rather than soft and pliable, it needs to be replaced.
- Cleanliness: Sometimes, a single strand of hair or a piece of lint stuck on the O-ring can break the surface tension and cause a leak. Wipe the gasket and the matching sealing surface on the pump housing with a damp cloth.
6. Reinstalling the Filter
Insert the clean filter back into the housing. Key to preventing leaks is to avoid cross-threading. Turn the cap slowly clockwise until it catches the threads smoothly. Continue turning until it is hand-tight. Do not use tools like pliers, as this can crack the plastic cap. The handle of the cap should typically be in a vertical or horizontal position (depending on your specific model’s alignment markers) when fully tightened.
Detailed Repair: Replacing the Seal or Assembly
If cleaning and re-tightening do not stop the leak, you will likely need to replace parts.
Replacing the Filter Cap Assembly
If the O-ring is damaged, LG typically sells the entire filter cap assembly rather than just the rubber ring. This is an inexpensive part and ensures you have a fresh threaded seal and a new gasket.
Read more LG washing machine AE error
- Purchase the correct filter assembly for your specific model number.
- Follow the removal steps above.
- Discard the old filter and screw in the new one.
Replacing the Drain Pump Assembly
If the leak persists despite a new filter cap, the issue likely lies in a cracked pump housing.
- Access the Pump: You will need to remove the top panel and the front control panel of the washer to access the internal drain pump assembly. This is more involved than a filter change.
- Disconnect Hoses: You will see the inlet hose from the tub and the outlet hose to the drain. Clamp these off or be prepared for water.
- Remove the Pump: Unscrew the pump from the chassis and disconnect the electrical wire harnesses.
- Install New Pump: screw the new pump in, reconnect wires and hoses, and reassemble the washer cabinet.
Preventive Maintenance Tips
To avoid a future LG washer leaking from drain pump filter disaster, incorporate these maintenance habits into your laundry routine.
Monthly Filter Cleaning
Set a reminder to clean the debris filter once a month. This prevents pressure buildup that can stress the seals. Frequent cleaning also keeps the threads clean, making it easier to open and close the cap without damaging the O-ring.
Inspect the Emergency Drain Hose
The small emergency drain hose can also be a source of leaks. Over time, the rubber can become brittle and crack, or the small plug can loosen. While you have the maintenance access panel open, give this hose a gentle squeeze to check for flexibility and cracks.
Proper Closing Technique
When closing the filter cap, pay attention to the tactile feedback. It should screw in smoothly. If you feel resistance immediately, you are likely cross-threading it. Back it out and try again. Forcing the cap will ruin the plastic threads on the pump housing, turning a $20 repair into a $150 repair.
Lubrication
If the rubber gasket feels dry but intact, you can apply a tiny amount of plumber’s silicone grease (not petroleum jelly, which degrades rubber) to the O-ring. This helps it slide against the housing for a better seal and keeps the rubber pliable longer.
Conclusion
An LG washer leaking from drain pump filter areas is a nuisance, but it is rarely a fatal blow to your appliance. By methodically checking the debris filter, inspecting the O-ring for damage, and ensuring the threaded seal is free of obstructions, you can resolve most leaks in under an hour. Remember that the presence of an OE error code is often your first warning sign that the drain system needs attention. Regular maintenance of the access panel area is the best defense against water damage, ensuring your front-load washing machine operates cleanly and efficiently for years to come.
Frequently Asked Questions
Why is my LG washer leaking specifically from the bottom left corner?
Water pooling in the bottom left corner almost always points to an issue with the drain pump assembly. This is where the debris filter is located. The leak is typically caused by a filter cap that isn’t tightened correctly, a clog causing back-pressure, or a worn-out rubber O-ring that can no longer create a watertight seal.
How does the OE error code relate to a leaking drain filter?
The OE error code indicates a “Water Outlet Error,” meaning the machine is struggling to drain. These issues are linked because a clogged filter can cause the pump to work harder and leak under pressure. Additionally, many leaks begin after a user opens the maintenance panel to resolve an OE error and fails to reseal the filter cap properly.
How often should I clean the debris filter to prevent leaks?
To keep your washer in peak condition and prevent leaks, you should clean the debris filter at least once a month. Regular maintenance prevents the buildup of lint and foreign objects that can damage the rubber gaskets or obstruct the threads, ensuring the filter always seats correctly.
Can I replace just the rubber O-ring if it is damaged?
While you can sometimes find generic O-rings, LG generally provides the rubber seal as part of the complete filter cap assembly. Replacing the entire cap is often the most effective and inexpensive way to ensure you have a fresh, pliable gasket and a clean threaded seal that fits your specific model perfectly.
What should I do if the filter is tight but the leak persists?
If you have cleaned the filter and tightened it by hand but water is still escaping, inspect the plastic pump housing for hairline cracks. Cracks can develop due to age or extreme vibrations. If the housing is cracked, cleaning the filter will not stop the leak, and you will need to replace the entire drain pump assembly.


