Proper ventilation is critical for maintaining a healthy home environment, preventing mold growth, and protecting your bathroom fixtures from moisture damage. While many homeowners are eager to learn How to install exhaust fan in bathroom window, the success of the project often hinges on the preparation phase. Before you begin removing the old window pane or drilling into the frame, gathering the correct equipment is non-negotiable. This guide will outline the essential Tools for bathroom window fan installation to ensure your project is completed safely, efficiently, and to a professional standard.

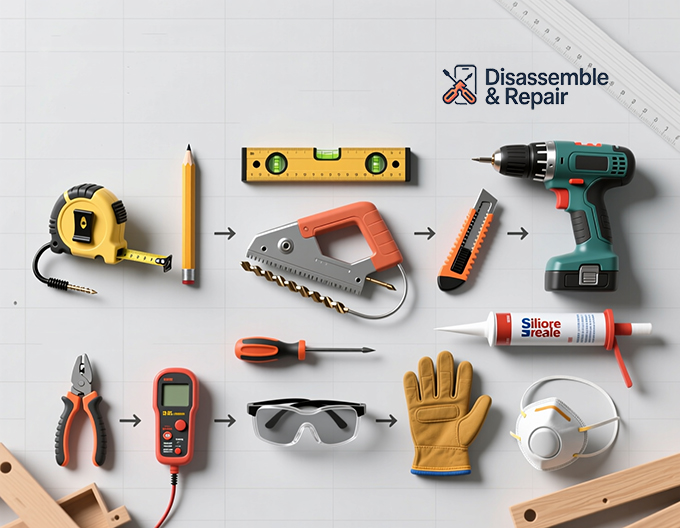
Essential Measuring and Layout Tools
Precision is the foundation of any successful DIY installation. A bathroom window fan must fit snugly to prevent air leaks and vibration. If the measurements are off by even a fraction of an inch, the unit may not seal correctly, compromising its efficiency.
Tape Measure and Ruler
A high-quality, retractable tape measure is indispensable. You will need to measure the dimensions of the window opening—height, width, and depth—multiple times. A rigid steel ruler or a combination square is also helpful for marking precise cut lines on filler panels or acrylic sheets.
Torpedo Level
Ensuring your fan sits perfectly horizontal is not just about aesthetics; it is about mechanical longevity. If a fan runs while tilted, it can cause uneven wear on the bearings and increase noise levels. A small torpedo level is compact enough to fit on the window sill and ensures your installation is plumb and level.
Marking Implements
Use a carpenter’s pencil for marking on wood frames and a fine-tip permanent marker for marking on acrylic or PVC filler panels. These marks will guide your cuts, so visibility and accuracy are paramount.
Cutting and Fabrication Equipment
Depending on your specific window type—whether it is a double-hung, sliding, or casement window—you may need to fabricate a custom mounting board or cut a hole in an acrylic sheet. This requires a specific set of Tools for bathroom window fan installation.
Power Drill and Bit Set
A cordless power drill is the workhorse of this project. You will need it to drive screws for mounting the fan to the window frame or sash. Additionally, a set of high-speed steel (HSS) drill bits is necessary for creating pilot holes. Pilot holes prevent the wood from splitting and ensure that screws drive in straight.
Jigsaw or Oscillating Multi-Tool
If you are installing the fan into a piece of plywood or a custom acrylic panel to fill the open window space, a jigsaw is often required to cut the circular or square opening for the fan housing. For tighter spaces or minor adjustments to the window stops, an oscillating multi-tool offers superior control and precision.
Utility Knife
A heavy-duty utility knife with fresh blades is essential for scoring paint around window sashes, trimming weather stripping, or cleaning up rough edges on plastic components.
Electrical Safety and Wiring Tools
Unless you are installing a purely plug-in model, you will likely be dealing with household wiring. Electrical safety cannot be overstated. When compiling your checklist of Tools for bathroom window fan installation, prioritize safety gear.
Non-Contact Voltage Tester
Before touching any wires, you must verify that the power is off. A non-contact voltage tester allows you to check for live current without physically touching the copper wires. This is a life-saving tool that every DIY enthusiast should own.
Wire Strippers and Lineman’s Pliers
To connect the fan to your home’s power supply, you will need to strip the insulation off the electrical wires. A dedicated pair of wire strippers ensures you remove the insulation without nicking the copper conductor. Lineman’s pliers are useful for twisting wires together securely before applying wire nuts.
Screwdrivers (Insulated)
A standard set of screwdrivers (Phillips and Flathead) is required for securing wire clamps and tightening the fan housing. Insulated screwdrivers provide an extra layer of protection against electrical shock.
Sealing and Weatherproofing Supplies
Once the mechanical and electrical installation is complete, the final step is weatherproofing. A bathroom window fan is a direct opening to the outdoors; without proper sealing, you invite drafts, insects, and moisture back into the home.
Caulk Gun and Silicone Sealant
A smooth-operating caulk gun is necessary to apply a bead of silicone sealant around the perimeter of the fan housing and the window frame. Use 100% silicone caulk designed for exterior windows and doors, as it remains flexible and waterproof over time.
Weather Stripping
Self-adhesive foam or rubber weather stripping helps create an airtight seal between the fan unit and the window sash. This prevents cold air from entering during the winter and keeps conditioned air inside during the summer.
Why Professional-Grade Tools Matter
Using the correct tools does more than just make the job easier; it ensures the longevity of the installation. A hastily installed fan using poor equipment can lead to vibration noise, water leaks, and even electrical hazards. Furthermore, a professional installation ensures you fully realize the long-term advantages of your new appliance. Properly installed ventilation is the key to unlocking the Benefits of a Bathroom Window Exhaust Fan, such as reduced humidity, odor elimination, and improved air quality.
Personal Protective Equipment (PPE)
Finally, never overlook personal safety.
- Safety Glasses: Protect your eyes from dust, wood chips, and plastic shards while cutting or drilling.
- Work Gloves: Protect your hands from sharp window edges, old nails, and splinters.
- Dust Mask: Essential when cutting wood or drilling into drywall to prevent inhalation of fine particulates.
Conclusion
Embarking on a bathroom upgrade is a rewarding project that adds value and comfort to your home. By gathering the proper Tools for bathroom window fan installation, you set yourself up for a smooth workflow and a professional-grade result. Whether you are cutting custom mounting panels or wiring the unit into the mains, having the right equipment ensures safety and precision. With your toolkit ready, you can confidently proceed to the installation phase, ensuring your bathroom remains dry, fresh, and well-ventilated for years to come.
Frequently Asked Questions
Why is proper ventilation important for bathrooms?
Proper ventilation is critical for maintaining a healthy home environment, preventing mold growth, and protecting bathroom fixtures from moisture damage.
What is the main goal of this guide on bathroom window fan installation?
This guide aims to outline the essential tools needed for bathroom window fan installation to ensure the project is completed safely, efficiently, and to a professional standard.
Why is precision important when installing a bathroom window fan?
Precision is the foundation of any successful DIY installation. A fan must fit snugly to prevent air leaks and vibration. If measurements are off, the unit may not seal correctly, compromising its efficiency.
What essential measuring and layout tools are required?
You will need a high-quality, retractable tape measure to measure window dimensions (height, width, and depth). A rigid steel ruler or a combination square is also helpful for marking precise cut lines on filler panels or acrylic sheets.
Why is a torpedo level necessary for fan installation?
A torpedo level is essential to ensure your fan sits perfectly horizontal. If a fan runs while tilted, it can cause uneven wear on the bearings and increase noise levels, affecting mechanical longevity.
What marking implements should be used?
Use a carpenter’s pencil for marking on wood frames and a fine-tip permanent marker for marking on acrylic or PVC filler panels. These marks are crucial for guiding your cuts accurately.
What cutting and fabrication equipment might be needed for the installation?
Depending on your window type, you may need a cordless power drill and bit set, a jigsaw or oscillating multi-tool, and a heavy-duty utility knife.
What is the purpose of a power drill and bit set in this project?
A cordless power drill is the workhorse for driving screws to mount the fan. A set of high-speed steel (HSS) drill bits is necessary for creating pilot holes, which prevent wood from splitting and ensure screws drive in straight.
When would a jigsaw or an oscillating multi-tool be used?
A jigsaw is often required to cut the circular or square opening for the fan housing if you are installing into a piece of plywood or a custom acrylic panel. An oscillating multi-tool is useful for tighter spaces or minor adjustments to window stops, offering superior control and precision.
Why is a utility knife recommended for this installation?
A heavy-duty utility knife with a fresh blade is recommended for various cutting tasks, although specific applications are not fully detailed in the provided text.