Whirlpool Refrigerator Control Board Replacement
Comprehensive Guide to Whirlpool Refrigerator Control Board Replacement
When your appliance stops cooling effectively or displays erratic behavior, a Whirlpool Refrigerator Control Board Replacement is often the necessary solution to restore functionality. As the central “brain” of the unit, the control board governs every major function, from the defrost cycle to the compressor operation, making its repair a critical task for appliance longevity. This guide provides a professional, step-by-step approach to diagnosing and replacing this component, ensuring you utilize the correct Original Equipment Manufacturer (OEM) parts and follow safety protocols.

Understanding the Role of the Main Control Board
The main control board is a sophisticated electronic control board located either on the back of the refrigerator or inside the ceiling of the fresh food compartment, depending on your specific layout. It acts as the central processing unit for the appliance. It receives input from temperature sensors and user interface panels, then sends voltage signals to components like the compressor, evaporator fan, and defrost heater.
Because this circuit board manages high-voltage and low-voltage currents simultaneously, it is susceptible to damage. A power surge or a voltage spike is the most common cause of failure, often damaging the sensitive microprocessors, relays, or electrolytic capacitors mounted on the board. When this component fails, the refrigerator may stop cooling entirely, or it may exhibit strange symptoms such as flashing lights or continuous clicking sounds.
Read more whirlpool refrigerator water leaking
Symptoms of a Faulty Electronic Control Board
Before ordering parts, it is essential to confirm that the board is indeed the culprit. Unlike mechanical failures, electronic failures can be intermittent. Look for the following signs:
Read more whirlpool refrigerator water dispenser leaking
1. Erratic Temperature Fluctuations
If the fridge is too warm while the freezer is too cold, or vice versa, and you have verified that the air damper and fans are working, the board may not be reading sensor data correctly.
2. The Refrigerator is Dead/Silent
If the interior lights turn on but the compressor and fans never engage, the board may have failed to send the “run” signal. This often happens if a relay on the board has burned out.
3. Error Codes
Modern Whirlpool units have a diagnostic mode that displays specific error codes on the front panel. Codes relating to “communication errors” or “EEPROM failures” usually point directly to the main board.
4. Visual Damage
Physical inspection often reveals the problem. Look for burn marks, melted plastic, or capacitors that appear swollen or are leaking fluid. These are definitive signs of a short circuit or heat damage.
Diagnostic Procedures and Multimeter Testing
To scientifically confirm the failure, you will need a digital multimeter. Safety is paramount; ensure you understand basic electrical concepts before probing live circuits.
Read more whirlpool refrigerator model number location
Step 1: Access the Board
Locate the board housing. You will likely need to pull the refrigerator away from the wall. Remove the cover plate to expose the circuit board.
Step 2: Visual Inspection
Before touching anything, look for the visual signs mentioned above (burns, swelling).
Read more whirlpool refrigerator condenser fan motor replacement
Step 3: Multimeter Testing
Set your multimeter to Volts AC. You need to verify that the board is receiving power but not sending it out.
- Check the input voltage at the power connector (Line and Neutral). It should read approximately 120V (or 240V depending on your region).
- If power is entering the board but the compressor relay is not sending 120V to the compressor (and the thermostat is calling for cooling), the board is defective.
Note: Always discharge static electricity from your body by touching a grounded metal object before handling the electronic control board, as static can destroy the new part immediately.
Sourcing the Correct OEM Replacement Parts
One of the most critical steps in a Whirlpool Refrigerator Control Board Replacement is sourcing the correct part. Refrigerators are manufactured in series, and the internal components can change even within the same year of production.
To ensure compatibility, you must locate the refrigerator model number tag, usually found on the interior wall of the fridge compartment. Do not rely on the user manual, as it covers multiple models. Use the specific model number to search for OEM replacement parts.
While aftermarket or “universal” boards exist, they are highly discouraged for main control units. OEM boards are calibrated specifically for the resistance values of your fridge’s thermistors and the amperage of your compressor. Using a non-OEM board can lead to inefficient cooling or further electrical damage.
Step-by-Step Guide for Whirlpool Refrigerator Control Board Replacement
Once you have diagnosed the issue and obtained the correct replacement unit, follow these steps to install the new board.
Tools Required:
- 1/4 inch nut driver or Phillips head screwdriver (depending on model)
- Needle-nose pliers
- Camera (smartphone)
- Anti-static wrist strap (optional but recommended)
Step 1: Ensure Electrical Safety
Disconnect the refrigerator from the wall outlet. Never attempt to replace a circuit board while the unit is plugged in. This protects you from electrocution and protects the new board from shorting out during installation.
Step 2: Expose the Control Board
Move the refrigerator away from the wall to access the rear panel. If your model houses the board inside the fridge ceiling, you may need to drop the control housing down by removing mounting screws.
Remove the metal or plastic access cover that protects the board. Keep the screws in a safe place.
Step 3: Document the Wiring Layout
Before disconnecting any wires, take a clear, high-resolution photo of the existing setup. The wiring harness connections are often color-coded, but they can be complex. Having a visual reference ensures you do not plug a connector into the wrong header.
Step 4: Disconnect the Wiring Harnesses
Carefully unplug the wire connectors. Some connectors have locking tabs that must be depressed before pulling. Do not pull on the wires themselves; grip the plastic connector plug. If a plug is stuck, use needle-nose pliers to gently wiggle it free.
Step 5: Remove the Old Board
The board is typically held in place by plastic locking tabs or screws.
- If held by tabs: Gently bend the plastic tabs outward while lifting the board. Be careful not to snap the plastic standoffs.
- If held by screws: Remove them and lift the board out.
Step 6: Install the New Main Control Board
Align the new board with the mounting tabs or screw holes. Press it firmly until it snaps into place or secure it with the screws you removed earlier.
Ensure the board is seated evenly and is not bending, which could cause stress fractures in the circuitry.
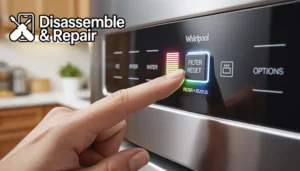
Read more whirlpool refrigerator reset
Step 7: Reconnect the Wiring
Refer to the photo you took in Step 3. Reconnect the wiring harness plugs to their corresponding headers on the new board. These plugs are usually “keyed,” meaning they fit only one way, but force should never be applied. Ensure every connection is seated fully and clicks into place.
Step 8: Reassemble and Program
Replace the access cover and secure it with screws. Plug the refrigerator back into the power outlet.
Important Note on Programming:
Some Whirlpool electronic control boards require a programming code to tell the board which specific model it is operating. This code is found on the model number plate (often labeled as “Code”).
- If your new board requires this, the display will usually flash or show “00” upon power-up.
- Follow the instructions included with the new part to input the code using the refrigerator’s front interface buttons.
Post-Installation Testing and Verification
After the Whirlpool Refrigerator Control Board Replacement is complete, the refrigerator will not cool down instantly. It may take up to 24 hours to stabilize temperatures. However, you can verify the repair immediately:
- Listen for the Compressor: Within a few minutes of plugging it in, you should hear the compressor and fans kick on.
- Check the Display: Ensure there are no error codes flashing on the interface.
- Run a Diagnostic: If you know the key combination, enter diagnostic mode again to ensure all systems (thermistors, fans, defrost heater) are communicating with the new board.
Frequently Asked Questions
Why did my control board fail?
Electronic components have a limited lifespan, but premature failure is usually caused by unstable electricity. A power surge from a lightning strike or grid fluctuation is the top killer of circuit boards. Heat buildup from a dirty condenser coil can also overheat the area where the board is mounted.
Can I repair the board instead of replacing it?
Technically, if you are skilled in soldering, you could replace a blown capacitor or relay. However, diagnosing exactly which microscopic component failed on a complex printed circuit board is difficult without advanced equipment. For reliability, replacing the entire assembly is the industry standard.
How can I protect the new board?
To prevent future failures, install a high-quality appliance surge protector between the refrigerator and the wall outlet. This sacrifices the surge protector rather than your expensive main control board in the event of a voltage spike. Additionally, vacuum the refrigerator coils every six months to keep the machine running cool and reduce heat stress on electronic components.
Conclusion
Performing a Whirlpool Refrigerator Control Board Replacement is a manageable task for a homeowner with basic DIY skills and the right approach. By correctly diagnosing the issue using multimeter testing, sourcing genuine OEM replacement parts based on your exact refrigerator model number, and carefully handling the wiring harness during installation, you can save hundreds of dollars in service fees. Always prioritize safety, and remember that the control board is the heart of your appliance—treating it with care ensures your refrigerator will continue to keep your food fresh for years to come.
Read more whirlpool refrigerator light not working
Frequently Asked Questions
Why do Whirlpool refrigerator control boards typically fail?
Electronic control boards most commonly fail due to unstable electricity, such as power surges from lightning strikes or grid fluctuations. Additionally, excessive heat buildup caused by dirty condenser coils can place unnecessary stress on the board’s sensitive microprocessors and capacitors, leading to premature failure.
How can I ensure I am ordering the correct replacement part for my fridge?
To ensure compatibility, you must locate the specific refrigerator model number on the tag inside the fresh food compartment. You should always source Original Equipment Manufacturer (OEM) parts rather than universal or aftermarket boards, as OEM units are precisely calibrated for your specific model’s thermistors and compressor amperage.
Does a new control board require programming after it is installed?
Some Whirlpool models require a specific programming code to be entered through the front interface buttons once the new board is powered on. This code is usually found on the refrigerator’s model number plate. If your unit requires this, the display will often flash “00” or a similar prompt immediately after you plug the appliance back in.
Can I repair a single component on the board instead of replacing the whole unit?
While it is technically possible to solder a new capacitor or relay onto the board, it is not recommended for most homeowners. Diagnosing which specific microscopic component has failed requires advanced equipment, and a DIY repair may not be as reliable as a full replacement. For the safety and longevity of the appliance, replacing the entire assembly is the industry standard.
Read more whirlpool refrigerator recall notices
What steps can I take to protect my new control board from future damage?
The best way to protect your investment is to install a dedicated appliance surge protector between the refrigerator and the wall outlet. Additionally, you should vacuum the refrigerator’s condenser coils every six months to reduce heat stress on the electronics and ensure the system runs efficiently.
Read more whirlpool refrigerator dimensions