Whirlpool Refrigerator Ice Maker Replacement
Comprehensive Guide to Whirlpool Refrigerator Ice Maker Replacement
A malfunctioning appliance can disrupt your daily routine, especially when you unexpectedly lose access to fresh ice during the warmer months. Performing a Whirlpool refrigerator ice maker replacement is often the most effective solution to restore convenience and functionality to your kitchen. While the prospect of appliance repair may seem daunting to the uninitiated, replacing an ice maker is a straightforward task that most homeowners can complete with basic tools and the right guidance. This guide provides a professional, in-depth look at diagnosing issues, sourcing the correct components, and executing the installation safely.

Initial Troubleshooting and Diagnostics
Before committing to a full replacement, it is essential to perform a thorough diagnostic assessment. Often, what appears to be a total failure of the ice maker assembly is actually a minor issue related to maintenance or peripheral components.
Read more whirlpool refrigerator garage ready
Check the Shut-Off Arm and Controls
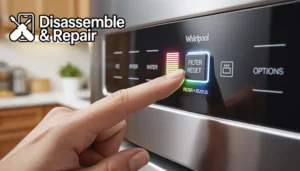
The most common non-mechanical reason for ice production to cease is the position of the shut-off arm. This metal wire or plastic lever detects the level of ice in the bin. If it is stuck in the “up” or “off” position, the ice maker will not cycle. Ensure the arm is down and able to move freely. On newer models, check the digital display to ensure the ice maker function has not been inadvertently disabled electronically.
Inspect the Water Supply and Filter
Flow restrictions can cause the ice maker to produce small, hollow cubes or stop working entirely. Inspect your water filter status; a clogged filter reduces water pressure, preventing the mold from filling correctly. If the filter is old, replace it. Additionally, check the fill tube located at the back of the ice maker. If this tube is frozen solid, water cannot enter the assembly. This usually indicates a leaking water inlet valve or low freezer temperatures, but simply thawing the tube with warm water might temporarily resolve the issue.
Identifying the Correct Parts
Successful appliance repair relies heavily on precision. You cannot simply purchase a generic part and expect it to function correctly within a sophisticated Whirlpool cooling system.
Locating the Model Number
To find the compatible replacement, you must locate the specific model number of your refrigerator. This is typically found on a sticker inside the refrigerator compartment on the side wall or ceiling. Whether you own a French door refrigerator or a Side-by-side refrigerator, this ID plate is the key to sourcing compatible components.
The Importance of OEM Replacement Parts
As a Senior SEO Specialist and industry expert, I strongly advise against using aftermarket generic parts. Always opt for OEM replacement parts (Original Equipment Manufacturer). OEM parts are engineered to the exact specifications of your Whirlpool unit, ensuring the mounting brackets, wiring harness connections, and voltage requirements match perfectly. Generic parts often lead to poor fitment, leaks, or electrical hazards.
Key Considerations Before Your Whirlpool Refrigerator Ice Maker Replacement
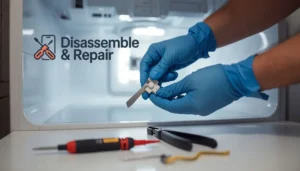
Preparing for the Whirlpool refrigerator ice maker replacement involves gathering the necessary tools and ensuring a safe work environment. This preparation minimizes downtime and prevents accidental damage to the appliance interior.
Required Tools
- 1/4-inch nut driver
- Phillips and flathead screwdrivers
- Needle-nose pliers
- Towels (to catch any water drips)
- Multimeter (optional, for continuity testing)
Safety Protocols
Safety is paramount. Before attempting any repair, unplug the refrigerator to eliminate the risk of electrical shock. Additionally, locate the water supply valve behind the fridge or under the sink and turn it off. This prevents accidental flooding when disconnecting water lines or valves.
Step-by-Step Installation Guide
The procedure below outlines the general steps for replacing the assembly. While slight variations exist between models, the core mechanics remain consistent across the Whirlpool lineup.
Step 1: Accessing the Ice Maker Assembly
Open the freezer compartment. If you have a Side-by-side refrigerator, you may need to remove the ice bucket and any shelves blocking access to the ice maker unit. For a French door refrigerator with a bottom freezer, the ice maker is typically located in the upper left corner of the fresh food compartment or on the door itself. Remove the cover plate if one protects the mechanism.
Step 2: Removing the Old Unit
Locate the mounting screws securing the ice maker to the freezer wall. typically, there are two screws on top and one on the bottom (a leveling bracket). Loosen the top screws—you often do not need to remove them completely, as the ice maker assembly usually hangs on keyhole slots. Remove the bottom screw entirely.
Lift the ice maker up and out of the mounting slots. Do not pull it away completely yet, as it is still tethered by the wiring harness.
Read more whirlpool refrigerator making noise
Step 3: Disconnecting the Wiring Harness
Identify the electrical connection. Squeeze the locking tab on the plastic plug and gently pull the wiring harness apart. If the plug is frozen or stuck, use a hair dryer on a low setting to warm the plastic slightly, making it more pliable. Do not pull on the wires themselves, as this can damage the refrigerator’s internal wiring.
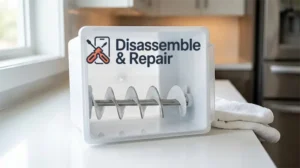
Step 4: Preparing the New Assembly
Compare your old ice maker with the new OEM replacement part. You may need to transfer the shut-off arm or a mounting bracket from the old unit to the new one. Ensure the wire harness on the new unit matches the refrigerator’s connection.
Step 5: Installing the New Ice Maker
Connect the wiring harness of the new assembly to the refrigerator plug. Ensure it clicks into place securely. Hang the new ice maker on the loosened top mounting screws. Insert and tighten the bottom leveling screw, then tighten the top screws firmly. Ensure the unit is level; an unlevel ice maker can result in water spilling into the bin and freezing the cubes together into a solid block.
Step 6: Final Checks
Reinsert the ice bucket and any shelves you removed. Restore power to the refrigerator and turn the water supply back on. Push the shut-off arm down to the “on” position.
Examining Related Components: The Water Inlet Valve
If you have completed the Whirlpool refrigerator ice maker replacement but still have no ice after 24 hours, the issue may lie upstream with the water inlet valve.
The water inlet valve is the solenoid-operated gatekeeper that controls water flow to both the dispenser and the ice maker. Over time, these valves can fail mechanically (getting stuck open or closed) or electrically (solenoid failure).
To test this, pull the refrigerator away from the wall and remove the lower rear access panel. Locate the valve where the household water line connects. You can test the solenoids for continuity using a multimeter. If a solenoid shows infinite resistance, the electrical coil is broken, and the valve must be replaced. A failing inlet valve is often the culprit when an ice maker leaks or the fill tube freezes repeatedly, as it may be allowing a slow trickle of water to seep through when it should be fully closed.
Post-Installation Cycle and Maintenance
Patience is required after installation. A standard ice maker needs to reach a temperature of roughly 15 degrees Fahrenheit (-9 degrees Celsius) before it initiates a harvest cycle. It can take anywhere from 12 to 24 hours for the new unit to produce its first batch of ice.
Discard the First Batch
It is industry standard practice to discard the first two or three batches of ice produced by a new assembly or after installing a new water filter. This ensures that any dust from manufacturing or shipping, as well as any air trapped in the water lines, is flushed out of the system.
ongoing Maintenance
To ensure the longevity of your new part, maintain the surrounding components. Change your water filter every six months. Periodically check the condenser coils on the back or bottom of the fridge; if they are covered in dust, the refrigerator struggles to cool efficiently, which can slow down ice production rates.
Read more whirlpool refrigerator door bins organization
Conclusion
Taking on a Whirlpool refrigerator ice maker replacement is a practical and cost-effective way to extend the life of your appliance. by understanding the interaction between the ice maker assembly, the water inlet valve, and the filtration system, you can diagnose issues accurately and avoid unnecessary service calls. Always prioritize safety, utilize OEM replacement parts, and follow the specific schematics linked to your model number. With these professional steps, you will ensure a steady supply of ice and a fully functioning kitchen appliance for years to come.
Frequently Asked Questions
How long does it take for a new ice maker to start producing ice?
After installation, it typically takes 12 to 24 hours for the unit to begin producing ice. The freezer must reach a temperature of approximately 15 degrees Fahrenheit (-9 degrees Celsius) before the ice maker initiates its first harvest cycle.
Where can I find the model number for my Whirlpool refrigerator?
The model number is usually located on a sticker or ID plate inside the refrigerator compartment. Look on the upper side walls or the ceiling of the unit. This number is essential for ensuring you purchase the correct OEM replacement part for your specific model.
Why is it necessary to discard the first few batches of ice?
It is recommended to throw away the first two or three batches of ice produced by a new assembly. This process flushes out any manufacturing dust, shipping debris, or air trapped within the water lines, ensuring your ice is clean and safe for consumption.
What should I check if my ice maker is still not working after being replaced?
If the new unit fails to produce ice after 24 hours, the issue may be the water inlet valve. This component controls the flow of water to the ice maker. You should also verify that the water filter is not clogged, the shut-off arm is in the “down” position, and the water supply line is fully turned on.
Can I use generic aftermarket parts for the replacement?
While generic parts may be cheaper, it is highly recommended to use OEM (Original Equipment Manufacturer) parts. OEM components are designed to the exact electrical and mechanical specifications of your Whirlpool refrigerator, reducing the risk of leaks, improper fitment, or electrical malfunctions.